Figma and design tools · Beginner · 12 min
Run a design critique in FigJam
By Padding · Updated 18 Nov 2026
FigJam (web) · November 2026
You will set up a FigJam board for one critique, run it in 30 minutes with a silent review before any discussion, and leave with a sorted list of agreed changes, each tied to the goal it serves.
On this page
A critique goes wrong in a familiar way. The designer shares the screen, talks for ten minutes, the most senior person reacts first, and everyone else agrees or adds a preference about colour. Half an hour later there are opinions in the air, nothing written down, and no way to tell which comments mattered.
The fix is structure, not better people. In this tutorial you build a FigJam board that puts the goal of the work in front of everyone, asks for feedback in a fixed format that has to name that goal, and gives people time to write before anyone speaks. Then you run the session to a 30-minute plan and finish with an action list sorted into what must change, what should change and what can wait.
You need your own screens for this. A flow of two to five screens with an open decision in it, such as a sign-up form or a checkout step, gives the best session. A single polished hero image gives the worst, because there is little to critique except taste.
Step 1 · Write the critique brief
Create a new FigJam board and name it after the work and the date, for example "Checkout critique 2026-11-20". Before adding any screens, write the brief. It is the most important part of the board, because every piece of feedback will be measured against it.
Add a text block or a large sticky with four short answers:
- Goal. What the screens are for, as an outcome for the user. "Returning customers can reorder in under a minute" is a goal. "Clean, modern checkout" is not, because nobody can disagree with it usefully.
- Stage. Rough layout, mid-fidelity, or nearly ready to build. This sets how much can still change.
- Questions. Two or three things you want help with. Write them as questions a reviewer can answer by looking: "Is it clear the delivery date can change?"
- Out of scope. What reviewers should not spend time on, such as placeholder copy, final colours, or a decision already made with the product owner.
If you cannot write the goal in one sentence, the critique is premature. Spend the time agreeing the goal with your product manager first.
Check it worked
Read the goal line aloud. You can name one thing on your screens that could fail it. You have at most three questions, and each one ends with a question mark. The out-of-scope list has at least one entry.
Step 2 · Lay out the board in sections
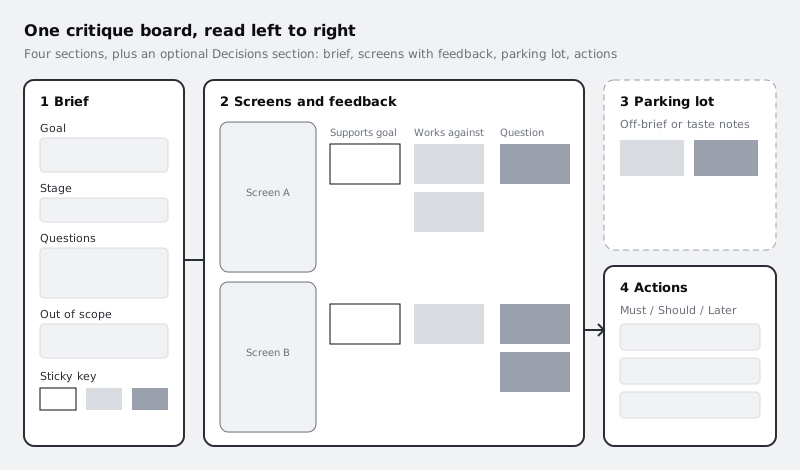
Pick the section tool from the toolbar at the bottom and draw four sections, plus an optional fifth. Name each one by double-clicking its title:
- Brief holds what you wrote in the last step.
- Screens and feedback holds the screens in a column on the left, with space to the right of each for stickies.
- Parking lot is for comments that are useful but outside the brief.
- Actions starts empty with three labelled columns: Must, Should, Later.
- Optionally, Decisions for anything the group settles during the session.
Copy your frames from the Figma design file (select them, copy) and paste them into the Screens section. They arrive as layers you can move, resize and lightly edit with FigJam's tools, but FigJam has no layers panel, so it is not the place to rework the design, which is what you want: the session is for feedback, not live fixes.
Put a small label above each screen with its name and number, so people can write "Screen 2" on a sticky instead of pointing.
Check it worked
Zoom out until the whole board fits on screen. You see four named sections, or five if you added Decisions. Each screen has a number label and empty space to its right roughly twice its own width. Dragging the Screens section moves the screens with it.
Step 3 · Set up the feedback template
Free-form stickies drift towards taste. A small template keeps each one tied to the brief. Pick three sticky colours and give each one a single meaning:
- Supports the goal. Something that works and should be kept.
- Works against the goal. Something that gets in the way of the goal or a brief question.
- Question. Something the reviewer did not understand, which is feedback in itself.
Put a key in the Brief section: one sticky of each colour with its meaning written on it. Then write one worked example per colour, so people see the shape you expect. Each sticky has two parts, the goal or question it relates to, and one observation:
- "Goal: reorder in a minute. The saved address is preselected, so I did not have to type anything."
- "Question 2: I did not see that the delivery date could change until I reached Screen 3."
One observation per sticky. A sticky with three points cannot be grouped or voted on, and the third point always gets lost.
Leave the example stickies in the key, not next to the screens, so they are not counted later.
Check it worked
The Brief section has a key with three colours and three example stickies, each naming a goal or a question number. Ask yourself whether a stranger could write a correct sticky using only the key. If the answer is no, shorten the colour meanings.
Step 4 · Plan the 30 minutes and the roles
Write the agenda as a short list at the top of the Brief section, so everyone can see where the session is:
- 0 to 3 minutes: brief. The designer reads the goal, stage and questions. No walkthrough of every screen.
- 3 to 13 minutes: silent review. Everyone writes stickies. Nobody talks.
- 13 to 24 minutes: discussion by cluster. The group talks through the biggest groups of stickies.
- 24 to 29 minutes: vote and actions. Pick what changes and write it as actions.
- 29 to 30 minutes: close. Confirm owners and when the group sees the next version.
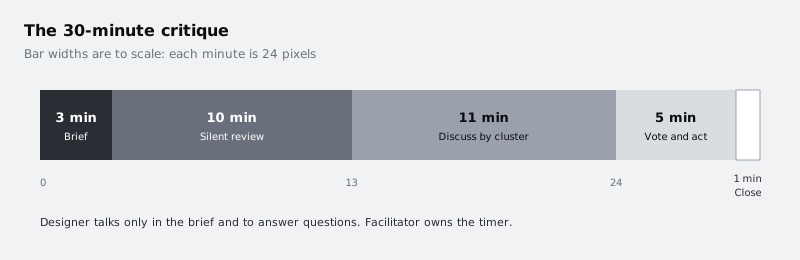
Name three roles in the meeting invite. The designer presents and then mostly listens; they answer questions but do not defend choices during the session. The facilitator runs the timer, keeps comments to the brief and moves off-brief points to the parking lot. The note taker writes decisions and actions on the board as they happen. In a small team the facilitator can also take notes, but the designer should do neither, because it is hard to listen and steer the conversation about your own work at the same time.
Share the board ahead of time with edit access for every reviewer, so nobody spends the silent review asking for permission.
Check it worked
The agenda on the board adds up to 30 minutes. The meeting invite names a designer, a facilitator and a note taker, and the designer is not the facilitator. Each reviewer appears in the board's share settings with edit access.
Step 5 · Run the brief and the silent review
Start on time. The facilitator hovers over their avatar in the top toolbar and chooses Spotlight me, so everyone's view follows the Brief section while the designer reads it out. Keep it to three minutes.
Then the facilitator ends the spotlight, opens the Timer, voting, and music menu at the top left, selects Timer and sets 10 minutes (the arrow keys change it a minute at a time). Everyone moves to the Screens section and writes stickies next to the screen they are about, using the colour key. Press S to add a sticky.
During the silent review:
- Nobody speaks, including the designer. Questions go on question stickies.
- If someone has already written your point, add a stamp to their sticky (press E) instead of writing a duplicate. It shows agreement without adding noise.
- Anything off-brief, such as an opinion on a colour that is marked out of scope, goes straight to the parking lot.
Writing first, in silence, means the quietest person's view lands on the board with the same weight as the loudest, and nobody anchors on the first comment said aloud.
Check it worked
When the timer reaches zero, every screen has stickies beside it, and stickies of all three colours are on the board. Most stickies start with "Goal" or a question number. If more than a quarter do not, the template was not clear enough; note that for next time and continue.
Step 6 · Cluster and discuss
The facilitator spends the first two minutes of discussion grouping stickies. Drag stickies that make the same point next to each other and give each group a short name in a text label, such as "Delivery date hidden" or "Form too long". Stickies that do not fit any group stay where they are.
Discuss clusters in order of size, largest first, and stop when the 11 minutes run out. For each cluster:
- The facilitator reads the cluster name and the stickies in it.
- The designer may ask questions to understand the problem, for example "Where on Screen 2 did you expect to see it?" They do not explain why it is designed that way.
- The group agrees whether the cluster is about the goal or a brief question. If not, it moves to the parking lot.
- The note taker writes any decision in the Decisions section.
The rule that keeps this useful is "problem before solution". People will propose fixes ("make the button bigger"). The facilitator turns each into the problem behind it ("people missed the button") and leaves the fix to the designer.
Check it worked
The Screens section has named clusters, each a group of stickies with a label. The parking lot has at least one sticky moved there during discussion, which shows the brief was being applied. The Decisions section, if you used it, has a line for each settled point.
Step 7 · Vote and turn clusters into actions
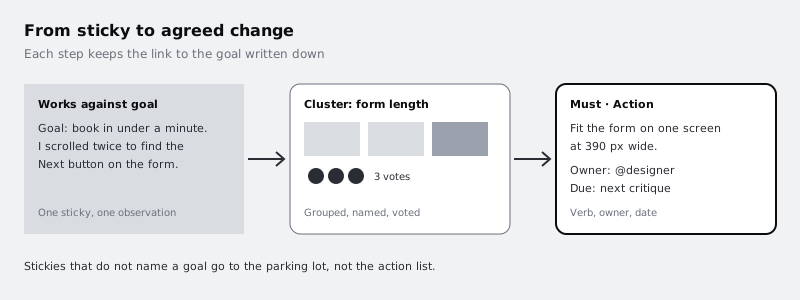
With five minutes left, decide which clusters lead to changes. On a paid team plan, open the Timer, voting, and music menu at the top left, choose voting, enter a prompt such as "Which problems must we fix before the next version?", give each person three votes and start the session. People vote by stamping cluster labels. Votes stay hidden until someone chooses End for everyone, so nobody follows the senior person's lead. On the free plan, ask everyone to put three stamps on cluster labels and count them; it works the same way, without the hidden results.
For each cluster with votes, the note taker writes one action sticky in the Actions section. An action has three parts:
- A verb and a change in the problem's terms: "Show the delivery date can change on Screen 2".
- An owner, added with an @mention, so the person is notified according to their notification settings.
- When it will be looked at again, usually "next critique".
Sort the actions into the three columns. Must is anything that blocks the goal, usually the clusters with the most votes. Should improves the goal but does not block it. Later is everything else worth keeping, including the best of the parking lot.
Check it worked
The Actions section has stickies in at least two of the three columns. Every action starts with a verb, has an @mention and names when it will be reviewed. Each Must action can be traced back to a cluster with votes on it.
Step 8 · Close the session and share the list
Use the last minute to read the Must column aloud and confirm each owner agrees. Then thank people and stop on time; ending at 30 minutes is what makes people come to the next one.
Within the hour, tidy the Actions section and share it. Copy a link to the Actions section (FigJam lets you link to a single section; the option is in its right-click menu), and post that link in your team channel with one sentence saying what you will bring to the next critique. Leave the full board as it is, so anyone can see where an action came from.
When the next version is ready, start the next critique board by duplicating this one, clearing the stickies and updating the brief. Check last time's Must actions against the new screens before anyone writes new feedback.
Check it worked
Your team channel has a message with a link that opens the board on the Actions section. Every action sticky shows a resolved @mention (the name is highlighted, not plain text). The list reads as a sorted set of agreed changes, Must first, that someone who missed the session could act on.
Next steps
- Collect written feedback between critiques with Share a Figma file and collect comments.
- Bring research into the brief with Report research findings so the team acts.
- Check your Must changes with real people using Test a Figma prototype with users.
Part of these paths
Related tutorials
- Share a Figma file and collect commentsYou will run one complete feedback round on a single Figma screen, from writing the question you need answered to sharing a link to that frame, sorting the comments and resolving every one.
- Report research findings so the team acts on themYou will have a short findings report that opens with the decisions it supports and backs each finding with evidence, plus a 15-minute playback plan that ends with a named owner for each recommendation.
Need this done for you?
Padding does this work for growing companies, from the first diagnosis to a system that keeps working.
Get new tutorials