UX and research · Intermediate · 17 min
Run a tree test on your navigation
By Padding · Updated 18 Nov 2026
A spreadsheet, index cards or a shared document, and a video-call tool for remote sessions · November 2026
You will have a proposed navigation tested with real people as a text-only tree, scored for success, directness and first click on every task, and a list of the labels to change before anyone designs a screen.
On this page
A card sort tells you how people group your content. It does not tell you whether the structure you built from those groups works when someone arrives with a job to do. A tree test checks that. You strip the navigation down to its labels, give people a task such as "find out where to park", and watch which labels they choose, level by level, until they stop at the one they think holds the answer.
Because there are no pictures, no layout and no search box, a tree test measures one thing: whether the words and the hierarchy lead people to the right place. That makes it cheap to run before any screen is designed, and cheap to run again after you change a label.
The example here follows on from a card sort for a community clinic's website. The proposed top level has six sections: Appointments, Before your visit, Medicines, Tests and results, About us and Contact. You will test it with ten people, score what they did and finish with a short list of labels to change, each backed by numbers from the test.
Step 1 · Turn the site map into a text-only tree
Open a new spreadsheet and name the first tab Tree. Write out your proposed structure as an indented list, one label per row, using columns for depth: top-level labels in column B, their children in column C, grandchildren in column D, and a fourth level, if you have one, in column E. Put an ID in column A for every row, built from its position: 2 for Before your visit, 2.1 for Getting here under it, 2.1.1 for Parking under that.
Include everything a real visitor could choose, down to the lowest level that holds content. If the live menu will show "Book an appointment" three levels deep, the tree shows it three levels deep. Leave out anything that helps people find things without reading the navigation: the search box, the home page promo tiles, footer links, icons and photos. Those are all useful on the finished site, but here they would hide a weak label.
Write each label exactly as it will appear in the menu. If the team has not settled on a wording, pick one now and note the alternatives in column F, after the depth columns; a tree test can only test one wording at a time.
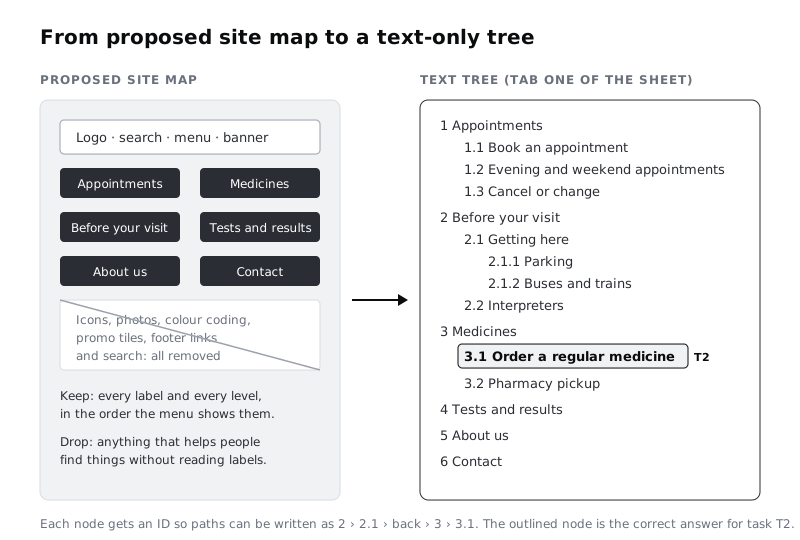
Count the rows. A small organisation's tree often runs to somewhere around 40 to 120 nodes. If yours is much larger, test the sections where the card sort showed the most disagreement rather than the whole thing.
Check it worked
Your Tree tab has one row per label, every row has a unique ID, and the depth of each label in the sheet matches the depth it will have on the site. Read the top-level labels aloud in order: they should be the same six (or however many) words a visitor would see across the top of the page, with nothing visual described in the sheet.
Step 2 · Write find-it tasks and mark the correct answers
Add a tab called Tasks. Write eight to ten tasks, each one a short situation that ends in something to find. Choose them from the reasons people actually come to the site (your research, search logs or the questions the front desk hears), and make sure every top-level section is the target of at least one task.
For the clinic, four of the ten read:
- T1: You work until 6pm on weekdays. Find out whether you could see a nurse on a Saturday.
- T2: You use the same inhaler every month and have two doses left. Where would you ask for more?
- T3: Your mother speaks Yoruba and very little English. Find out whether someone can translate for her at her appointment.
- T4: You are driving to the clinic for the first time. Find out where you can leave the car.
Read each task against the tree and remove any word that also appears in the correct label. "Find out about parking" sends people to the one node with Parking in it; that tests reading, not navigation. "Where you can leave the car" makes them think. When the label's word is the only word people would use (blood test, for example), keep it and note in the sheet that the task gives the answer away.
Then, next to each task, write the ID of every node that counts as a correct answer. A task has two only when the content will genuinely live in both places on the finished site. For T1 the only correct node is 1.2 Evening and weekend appointments: Contact in this tree holds no opening hours, so a reader who stops there has not found the answer, however reasonable the guess. Decide now, before you see any results, so you are not tempted to accept an answer later because many people chose it.
Check it worked
Your Tasks tab has eight to ten tasks, each with at least one correct node ID that exists in the Tree tab. Every top-level section is the target of at least one task, and no task shares a key word with its own correct label unless you have marked it as unavoidable.
Step 3 · Prepare the test and try it on one colleague
The rule that makes a tree test work is that people only ever see one level at a time: the top-level labels, then the children of whichever label they choose, and so on. They can go back up, and they say when they think they have found the answer. Pick the way you will show the tree:
- In person, on paper. Write each list of sibling labels on its own index card: one card for the top level, one for the children of Appointments, one for the children of Before your visit, and so on. Write the parent's ID small in a corner so you can find the right card quickly. Lay down the top-level card, and swap in the next card when the participant picks a label.
- Remote, by screen share. Make a document with one page per card and share only the page you are showing. Move to the page for the label they choose. It is slower than paper, so allow a little more time.
- Unmoderated, with a tree-testing service. Several research platforms run tree tests online and record each path for you, which lets you test with far more people. Load the same tree and tasks, and read the service's own documentation for how it scores answers before you compare its numbers with the ones in this tutorial.
The rest of this tutorial uses the first two, run by a facilitator with ten participants. Ten people will not give you precise percentages, but they will show the labels that send most people the wrong way, and you will hear why.
Add a third tab called Results with these columns: participant, task, path, final node, success, direct, first click, confidence, notes. Run the whole test once with a colleague who has not seen the tree, and time it.
Check it worked
You have a complete set of cards (or pages), one for each node that has children, and your colleague finished every task without you needing to explain what a label meant. The run took under 20 minutes. If it took longer, cut tasks until it does not; people lose concentration and start choosing at random.
Step 4 · Run the sessions and record every path
Recruit eight to twelve people who match your audience, and get their consent before you start (see the tutorial on informed consent in Next steps). For the clinic, that means patients and carers, not staff, who know where everything lives.
Open each session the same way: "I'll give you a task. You'll see a list of words, like a website menu. Choose where you would look, and I'll show you what is under it. You can go back. Tell me when you'd expect to find the answer there. There are no wrong answers; we are testing the menu, not you."
Then, for each task:
- Read the task aloud and leave it written down where they can see it.
- Show the top level and wait. Do not hint, and do not react to their choices.
- Each time they choose a label or go back, note its ID. "Back" is written as the word back.
- When they say "here", ask how sure they are on a scale of 1 to 3, and write it in the confidence column.
- If they give up, record the path so far and write "gave up" as the final node.
Change the order of the tasks for each participant, for example by starting each person one task later in the list. Otherwise everyone does the hardest task when they are tired, or learns the tree from the first few tasks and finds the last ones easily.
Check it worked
The Results tab has one row per participant per task (about 100 rows for ten people and ten tasks), and every path is written as a sequence of IDs such as 2 › 2.1 › back › back › 3 › 3.1. No row is blank. Gave-up rows show the path up to the point they stopped.
Step 5 · Score each attempt for success, directness and first click
Go through every row in Results and fill in three columns.
- Success. Yes if the final node is one of the correct IDs in Tasks, otherwise no. Gave up is no.
- Direct. Yes if the path contains no "back" at all. A participant who heads down the wrong branch, backs out and then finds the answer is a success, but not a direct one.
- First click. Right if the first ID in the path is the top-level section that holds a correct answer, otherwise wrong. For a task with correct answers in two sections, either counts.
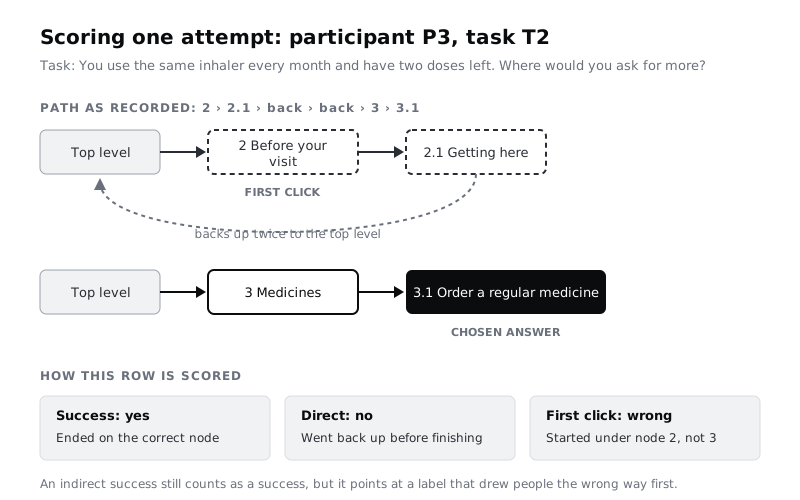
Score from the path, not from what you remember of the session. If two of you ran sessions, swap ten rows and score each other's to check you are applying the rules the same way.
Check it worked
Every row has a value in success, direct and first click. Pick three rows at random and score them again from the path alone: you get the same three values. Any row where success is yes must have a final node that appears in that task's list of correct IDs.
Step 6 · Read the results task by task
Add a fourth tab called Summary with one row per task and these columns: success rate, direct success rate, first-click rate, and the three most common final nodes with how many people chose each. Use COUNTIFS on the Results tab, so that the summary updates if you correct a score.
Three numbers together tell you more than any one of them. For each task, find its pattern:
- High success, right first click. The path works. Leave it alone.
- High success, wrong first click. People get there in the end, but a top-level label draws them the wrong way first. Look at where they went first.
- Low success, right first click. They found the right section and then got lost. The problem is a label lower down.
- Low success, wrong first click. The content is in a place people do not expect. The problem may be the structure, not a word.
Then look at the most common wrong final nodes. When several people end at the same wrong place, that place is where they expect the content to be. In the clinic test, six of ten people answered T4 (where to leave the car) by stopping at 6 Contact, because they expected directions on a contact page. Only three found 2.1.1 Parking. That is a clear signal: either Contact needs to hold directions, or Before your visit needs a label people associate with travel.
Read the confidence scores next to the failures. A wrong answer given with confidence 3 means the label misled people; a wrong answer with confidence 1 means they were guessing because nothing fitted.
Check it worked
The Summary tab has one row per task, each labelled with one of the four patterns from the list above. For every task below about two-thirds success, you have written the wrong node most people chose and one sentence on why, drawn from their confidence scores and anything they said during the session.
Step 7 · Turn the findings into label changes and test again
Add a final tab called Changes. Write one row for each change you would make, with four columns: the node ID, the current label, the proposed change, and the evidence (the task, its numbers and the wrong node people chose).
From the clinic test, the list read:
- 2 Before your visit → "Getting to the clinic", with Interpreters moved under Appointments. Evidence: T4 had 3 of 10 successes, 6 ended at Contact; T3 had 4 of 10, with 5 first clicks on Appointments.
- 3.1 Order a regular medicine → keep. Evidence: T2 had 9 of 10 successes, though 3 started under Before your visit; recheck after node 2 is renamed.
- 6 Contact → add "Opening hours" as a child. Evidence: T1 had 4 of 10 people stop at Contact while looking for Saturday appointments.
Keep each change small enough that you can say which result it answers. Then update the Tree tab, keep the same tasks, and run a second round with five or six new people. The second round is where the tree test pays off: you see whether a renamed label fixed one task without breaking another.
Check it worked
The Changes tab has a row for every task with low success or a wrong first click, and each row cites the numbers behind it. After the second round, the Summary for the changed tasks shows higher success than the first round, and no task that scored well before has dropped.
Next steps
The navigation you tested is still only words. Once the labels hold up, the next questions are about screens and flows.
- If you have not built the structure yet, start with /tutorials/analyse-card-sort-results, which turns card sort data into the site map you test here.
- When the navigation is designed into real screens, test whole tasks with /tutorials/plan-a-usability-test.
- To find participants who match your audience rather than whoever is available, read /tutorials/recruit-participants-for-user-research.
- Before any session, set up consent properly with /tutorials/get-informed-consent-for-user-research.
Related tutorials
- Analyse card sort results with a similarity matrixYou will turn raw open card sort data into a similarity matrix in a plain spreadsheet, read which cards belong together, and finish with a draft site map that has the evidence for every section written beside it.
- Plan a usability test with tasks and success criteriaYou will have a written usability test plan for a booking flow, with scenario tasks that do not give away the answer, a success rule for each task and a session script another person could run without you.
Need this done for you?
Padding does this work for growing companies, from the first diagnosis to a system that keeps working.
Get new tutorials