Figma and design tools · Beginner · 16 min
Make a slide presentation in Canva
By Padding · Updated 18 Nov 2026
Canva (web) · November 2026
You will have a finished ten-slide Canva deck built from a written outline, with one idea per slide, text sized to read from the back of a room, three repeated layouts and speaker notes, ready to present or download.
On this page
Most slide decks go wrong before the first slide is made. The writer opens a template, fills the boxes, and the talk turns into whatever the template had room for. Slides end up holding paragraphs the audience reads instead of listening, and the point of the talk gets lost somewhere around slide six.
This tutorial works the other way round. You write the message first, as ten sentences on a page. Each sentence becomes one slide, and Canva is only where you set those sentences out. You will fix three layouts and a small set of text sizes before you build anything, so every slide is readable from the back of a room and looks like it belongs with the others. Then you add speaker notes, rehearse with Presenter View and either present from Canva or download a copy.
If you do not have a talk to hand, use this one: a ten-minute update to a residents' meeting asking for volunteers to run a community tool library. The examples below use it.
Step 1 · Write the talk as ten sentences
Close Canva for now. In any notes app or on paper, answer one question in a single sentence: what should the audience do or believe when you finish? For the example: "Give two Saturday mornings a year so the tool library can open every week."
Now write ten sentences that get the audience there, one per line. Each sentence is a claim, not a topic. "Volunteers" is a topic. "We need twelve volunteers to open every Saturday" is a claim. A typical order:
- The opening: why this matters to the people in the room.
- Two or three sentences on the problem.
- Three or four sentences on what you propose and what it takes.
- One sentence with the key number.
- The ask, as it would be said out loud.
- What happens next, with a date.
Read the ten lines aloud in order. If a line only makes sense with the line before it repeated, merge them. If one line holds two claims joined by "and", split it and cut a weaker line elsewhere to stay at ten.
Check it worked
You have exactly ten numbered lines. Every line is a full sentence with a verb, none is longer than about fifteen words, and the last two lines say what you want from the audience and when.
Step 2 · Start a presentation and plan three layouts
In Canva, create a new design and choose Presentation. The standard presentation is 16:9 and 1920 by 1080 pixels; keep it, because it matches most projectors and screens. Start from a blank presentation or the plainest template you can find. A busy template fights the rule you are about to set.
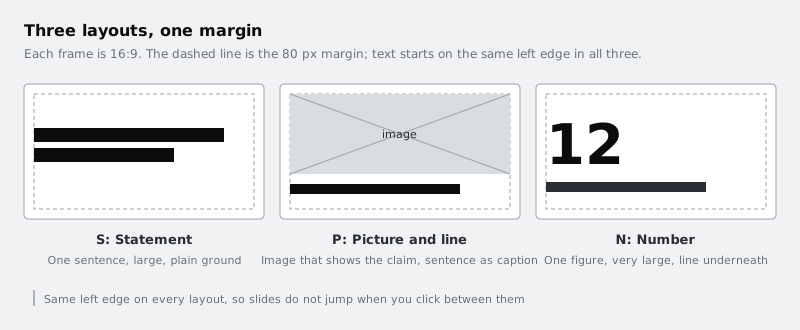
Look at your ten sentences and sort them into three kinds of slide. Nearly every talk fits these three:
- Statement: the sentence alone, large, on a plain background. Most of your slides are this kind.
- Picture and line: a photo or simple diagram that fills most of the slide, with the sentence as a caption.
- Number: one figure, very large, with the sentence underneath explaining it.
Build each layout once, on its own page, with placeholder text. Use one typeface for the whole deck (a heavy weight for headlines, regular for everything else) and two colours: one for text and one for the background, with an accent only if your organisation has one. Leave a clear margin of at least 80 pixels on every edge of each layout, and line the text up to the same left margin on all three.
Check it worked
Your presentation has three pages, one per layout. Text on all three starts at the same distance from the left edge, and next to each of your ten outline lines you have written S, P or N for the layout it will use.
Step 3 · Set text sizes that read from the back of the room
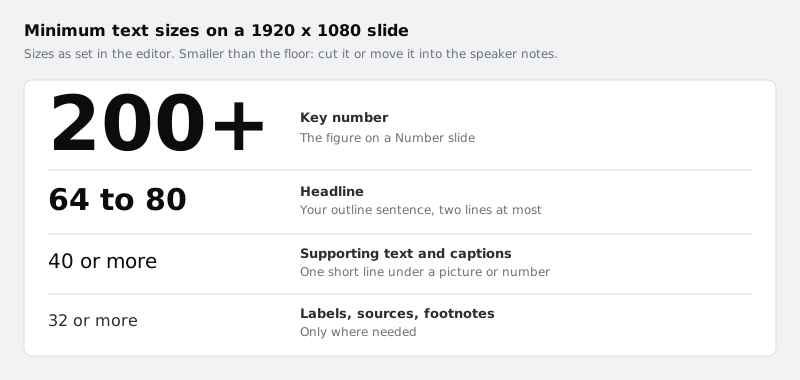
Text on a slide is read from several metres away, often on a dim projector. On a 1920 by 1080 page, use these sizes as a floor:
- Headline (your outline sentence): 64 to 80.
- Supporting text and captions: 40 at least.
- Labels, sources and footnotes: 32 at least, and only where you need them.
- The number on a Number slide: 200 or more.
Set these on your three layout pages now. If a sentence does not fit at 64 on two lines, the sentence is too long: shorten it in your outline, not the type. Keep line spacing generous, around 1.2 times the size, and avoid all capitals for anything longer than two words, because a line in capitals is harder to read at a distance.
Contrast matters as much as size. Dark text on a light background, or light on dark, is safe. Light grey on white or text over a busy photo is not; if a picture slide needs text over the image, put a solid block of colour behind the text.
Check it worked
Select the headline on each layout page and read its size in the toolbar: every headline is 64 or larger, and no text on any layout is below 32. Zoom the editor out until a slide is about the size of a playing card on your screen; you can still read every word.
Step 4 · Build the ten slides from the outline
Now fill the deck. For each outline line, duplicate the matching layout page (S, P or N) and replace the placeholder with your sentence. Duplicating keeps the font, sizes and positions identical; restyling a fresh page by hand is how decks drift.
Keep to one idea per slide. If you feel the need to add a second sentence or a bullet list, that material belongs in the speaker notes, which you add later. For Picture and line slides, choose images that show the claim (a shelf of labelled drills for "Most households use a drill for thirteen minutes a year"), not decoration. For Number slides, round the figure to what people can remember.
When all ten slides exist, delete the three original layout pages, or move them to the end while you edit and delete them before you present.
Check it worked
Look along the page thumbnails at the bottom of the editor. You see ten slides in the same order as your outline, and the sentence on each slide matches its outline line word for word or is shorter.
Step 5 · Run a consistency pass
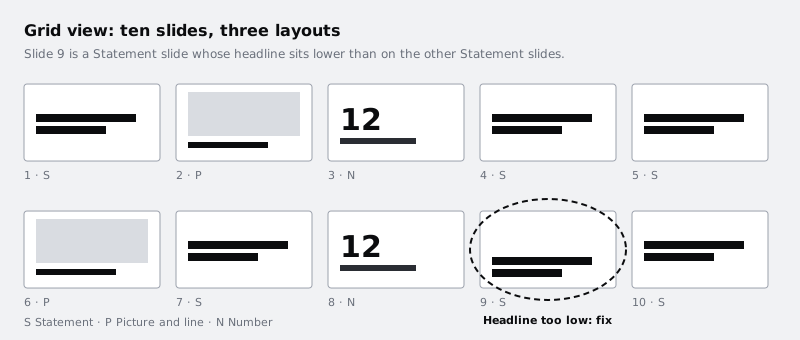
Open Grid view (the button in the bottom bar of the editor), so you see every slide at once. Small differences jump out at this size. Look for:
- A headline that sits higher or lower than on the other slides of the same layout.
- A size that crept in by mistake, such as a 58 headline among 72s.
- A second font, a stray colour or an image that does not reach the edge it should.
- More than two lines of headline text anywhere.
Fix each one by matching it to a slide that is right. Select the headline on a correct slide of the same layout, open Position from the toolbar and, in its Arrange tab, note the X and Y values. Then select the headline on the slide that drifted and type the same X and Y values in the same place. Do the same for the size: read it on the correct slide and type it into the slide that is off.
Check it worked
In Grid view, every slide of the same layout has its headline in the same place and at the same size. Click through any two Statement slides one after the other: nothing jumps.
Step 6 · Write speaker notes
The detail you kept off the slides goes into notes. Open the notes panel from the bar at the bottom of the editor, then select each page and type what you will say while it is on screen. Notes are only visible to you in Presenter View; the audience never sees them.
Write notes as prompts, not a script. Three or four short lines per slide work better than a paragraph you will be tempted to read:
- The sentence on the slide, said in your own words.
- One fact, example or story that backs it up.
- The bridge to the next slide ("So what would it take?").
Put any source for a number in the notes too, so you can answer if someone asks.
Check it worked
Every one of the ten slides has notes. None runs longer than about five lines, and the last line of each note leads into the next slide.
Step 7 · Rehearse in Presenter View
Use the Present option at the top right of the editor and choose Presenter View. Canva opens two windows: one for the audience with the slide full screen, and one for you with your notes, the next slide and a timer. With one screen, put the presenter window to the side and practise from it.
Give the whole talk aloud, at speaking pace, and note the time at the end. For a ten-minute slot, aim to finish in about eight minutes to leave room for questions. If you run long, cut a slide rather than speak faster; your outline tells you which sentence is the weakest.
Check it worked
You have given the talk aloud from Presenter View at least once and written the run time next to your outline. It is within the time you were given, with a margin left over.
Step 8 · Present from Canva or download a copy
You have three ways to show the deck, so pick before the day:
- Present from Canva: open the design on the laptop connected to the screen and use Present, as you did in rehearsal. Canva's help explains how to present offline if the venue's internet is unreliable; test that at home first.
- Download a PDF: from Share, choose Download and pick PDF. A PDF opens on almost any computer and keeps your layout. Canva can include your notes in the PDF, which is useful as a printed backup, but turn that off for the copy you send to the audience.
- Download a PowerPoint file: from the same Download options, choose the PowerPoint format if the venue insists on it. A PowerPoint file can look different from your Canva design, most often because the fonts you used are not installed on that computer, so open it on the venue's computer before the talk and check every slide.
Whichever you choose, keep a PDF copy on a USB stick or in your email as a fallback.
Check it worked
You have either presented the deck from Canva on the screen you will use, or you have a downloaded file that you opened on another computer and clicked through all ten slides with every font and image in place.
Next steps
- Set up a brand kit in Canva to save your typeface and colours so the next deck starts on brand.
- Report research findings so the team acts applies the same message-first approach to presenting findings from user research.
- Choose between Figma, Sketch, Adobe XD, Penpot, Framer and Canva helps when a deck turns into something bigger, such as product screens or a website.
Part of these paths
Related tutorials
- Set up a brand kit in Canva for a small businessYou will have a Canva Brand Kit holding your logo, colours and fonts, and one template for repeat posts that anyone on your team can fill in without breaking the look.
- Report research findings so the team acts on themYou will have a short findings report that opens with the decisions it supports and backs each finding with evidence, plus a 15-minute playback plan that ends with a named owner for each recommendation.
Need this done for you?
Padding does this work for growing companies, from the first diagnosis to a system that keeps working.
Get new tutorials