Figma and design tools · Beginner · 14 min
Design a printable flyer in Canva
By Padding · Updated 18 Nov 2026
Canva (web) · November 2026
You will have an A5 open day flyer with bleed, safe margins, a clear reading order and a tested QR code, exported as a print-ready PDF a print shop will accept.
On this page
A flyer that looks right on screen can come back from the printer with a white sliver down one edge, a QR code that will not scan, a photo that has gone soft and blue that has turned purple. None of those are design mistakes in the usual sense. They come from treating paper like a screen.
In this tutorial you design an A5 flyer for an open day at Larkfield Clinic, a fictional community clinic, and get it ready for a print shop. Along the way you set up the three print basics that screen-only guides skip: bleed, safe margins and resolution, plus what happens to colour on paper. The flyer has one job: get people living nearby to come on Saturday, or scan to book a free health check.
Canva's menus move between releases. Where a label may change, this tutorial says what you are looking for and roughly where it lives.
Step 1 · Write the words before you open Canva
Open any notes app and write the flyer's copy in plain text first. A flyer is read in passing, on a noticeboard or a reception desk, so the words decide whether it works. For Larkfield Clinic:
- Headline: Larkfield Clinic open day
- When and where: Saturday 6 December, 10am to 2pm, 14 Mill Lane, Larkfield
- What is on: Free blood pressure checks. Meet the nurses and the new physiotherapist. Children's corner with books and crayons.
- Action: Scan to book a free health check, or drop in
- Fallback address: larkfield.example/openday
- Footer: clinic phone number
Now cut. Read the headline and the when-and-where line out loud; if someone walking past could not repeat them back, shorten them. Keep "What is on" to three lines at most. Anything that does not help a reader decide to come, or tell them how, belongs on the web page the QR code opens, not on the flyer.
Check it worked
Your note has six labelled parts, the headline is eight words or fewer, and the whole note (without labels) is under 60 words. Count them; Canva will not do it for you.
Step 2 · Create an A5 design and turn on bleed and margins
In Canva, start a new design with a custom size. Open the units list next to the size fields, choose mm, and enter 148 wide by 210 high. That is A5 portrait, half an A4 sheet, which most print shops stock and price as a standard flyer.
Next, make the print edges visible. Open the File menu at the top of the editor and look for the view settings: turn on Show print bleed and Show margins, and turn on rulers too. On some versions these sit under Settings inside the File menu; on others they are under Rulers and guides.
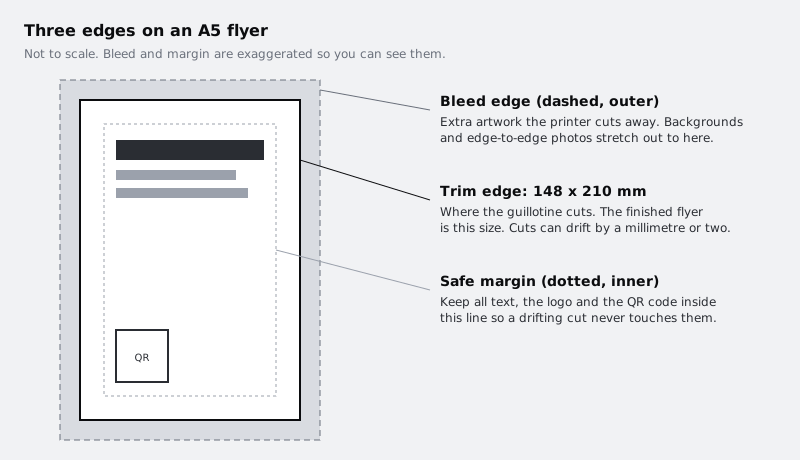
You now see two extra lines on the page. The outer dashed line is the bleed: a strip of extra artwork beyond the paper edge that the printer cuts away. Canva adds about 3 mm on each side and you cannot change it. The inner line is a safe margin: keep text, logos and the QR code inside it. Guillotines drift by a millimetre or two, and anything right on the trim edge can be sliced or end up uncomfortably close to the cut.
Rename the design something you will find later, such as "Larkfield open day flyer A5", by clicking its title in the top bar.
Check it worked
The page shows a dashed line a little outside its edge and a second line inside it. Open the resize options from the top bar and look at the current size: the design is 148 × 210 mm, not a pixel size that happens to look similar.
Step 3 · Place the photo so it runs off the edge
Drag your photo onto the page and pull it out until its edges sit on the outer bleed line, not the page edge. Put it across the top third of the flyer. If a photo stops exactly at the trim edge, a slightly off-centre cut leaves a thin white line. Taking it to the bleed means the cut always lands inside the picture.
Check the photo is sharp enough for paper. Print needs roughly 300 pixels for every inch printed, which is why Canva's print PDF is built at 300 dpi. A photo covering the full width of an A5 flyer including bleed is about 6 inches wide, so it needs around 1,800 pixels across. A photo filling only the top third needs the same width but a third of the height. Phone photos taken in the last few years are usually far above this; images saved from websites or messaging apps often are not.
If you are unsure, zoom the editor to 200% and look at faces and edges. Softness or blocky steps you can see at that zoom will show on paper.
Leave a solid background colour or white behind the rest of the page. If you use a coloured background, stretch it to the bleed line as well.
Check it worked
Zoom in on each corner of the photo. Its edges sit on or beyond the outer dashed line, and no white shows between the photo and the bleed. At 200% zoom, faces are crisp.
Step 4 · Set the reading order with size and position
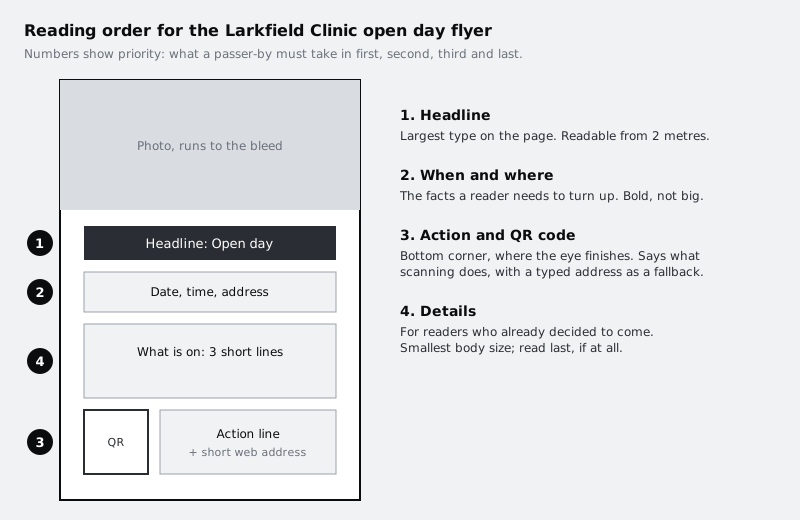
A flyer has a few seconds. Decide what a passer-by must take in first, second, third and last, then make the layout say the same thing. For the open day:
- Headline directly under the photo, the largest type on the page. On A5, 40 to 48 point bold reads from a couple of metres away.
- When and where under the headline, bold but smaller, around 16 to 18 point. These are the facts someone needs to turn up.
- Action and QR code in the bottom corner, where the eye finishes a page.
- What is on between them, as three short lines at 11 to 12 point. Readers who have already decided to come will read it; others will skip it, and that is fine.
Use one typeface family, two at most, and left-align the text blocks to a shared edge. Use Canva's alignment guides (the coloured lines that appear as you drag) to snap each block to the same left edge, and keep the same gap between blocks. Equal gaps make the page read as a sequence; uneven ones make it look like a collage.
Check it worked
Print nothing yet. Shrink the editor zoom until the flyer is about the size of a playing card on your screen. You can still read the headline and the day, and your eye moves from photo to headline to date to the QR code without jumping back up. Every text block shares one left edge and sits inside the safe margin.
Step 5 · Choose colours and type that survive paper
Screens make colour from light (RGB); printers lay down ink (CMYK) on paper that absorbs some of it. A few things change on the way:
- Bright, saturated blues, greens and oranges get duller. Many of the most vivid screen colours have no ink equivalent. If your design depends on an electric blue, expect a calmer one.
- Large dark areas can look muddy or show streaks on digital printers. A deep grey or a dark tint of your brand colour often prints more cleanly than a full black panel.
- Thin, small, light text on a dark background fills in. Ink spreads slightly into paper, so keep reversed-out text (white on dark) at 11 point or above and in a regular or bold weight, not light.
- Contrast matters more, not less. A flyer is read under shop lighting and in daylight. Keep body text dark on light and avoid pale grey text for anything a reader needs.
If your organisation has brand colours, enter their hex values in the colour picker, or apply them from the Brand Kit if you have one (Brand Kit is optional and part of Canva's paid plans). Canva works in hex while you design and converts to CMYK only when you download a PDF Print with the CMYK profile. If exact ink matching matters, give the print shop the CMYK values from the brand guide and ask them to check the colours before the run.
Check it worked
Your flyer uses at most three colours plus black and white. No body text is lighter than a mid-grey, and any white text on a dark area is 11 point or larger. Write the colour codes you used in your copy note so you can reuse them on the next flyer.
Step 6 · Add the QR code and test it on paper
Open Apps in the left sidebar, search for "QR code" and open Canva's QR code app. Paste the full web address, including https://, and generate the code. It is added to the page as an element you can move and resize.
Before you move on, read the address in the app character by character. This kind of QR code stores the address directly in the pattern, so a typo means reprinting the whole batch. If the page address might change after printing, create a short, stable address on your own website that you can redirect later, and put that in the code instead.
Place the code in the bottom corner, inside the safe margin. Size it at about 25 mm square: big enough to scan from a hand's length without fiddling, small enough not to dominate. Keep a clear, pale area around it at least as wide as one of its small corner squares; a QR code touching a photo or a dark panel can fail to scan.
Next to it, write what scanning does ("Scan to book a free health check") and print the short web address underneath for people who will not scan.
Check it worked
Hold your phone at arm's length from the screen and scan the code with the camera app. It opens the exact page you meant, not a home page or an error. Then scan it again with a second phone, ideally a different make. Both open the right page.
Step 7 · Proof it on your own printer
Use Share, then Download, choose PDF Standard for now, and print the first page on A4 at 100% / actual size (not "fit to page"). Trim it roughly with scissors along the page edge, or fold the A4 in half to get a sense of A5.
Now read the paper, not the screen:
- Read every word aloud. Check the date matches the day of the week; a wrong date is the most common flyer error.
- Hold it at arm's length and see whether the headline and day still read.
- Scan the printed QR code with two phones, in normal room light.
- Look at colours under daylight. Home printers are not a colour proof, but if something looks far off, it will look off at the print shop too.
Ask one other person to read it cold and tell you when and where the open day is. If they hesitate, the when-and-where line needs more weight.
Check it worked
You have a printed copy with your corrections marked in pen, the QR code scans from paper on two phones, and someone who has not seen it before can tell you the day, time and place within five seconds. Make the corrections in Canva before exporting the final file.
Step 8 · Export the print-ready PDF
Ask the print shop three things before you export, in an email or on their order page: the file format they want (almost always PDF), whether they want crop marks and bleed included, and whether they need CMYK or accept RGB. Many digital print shops accept an RGB PDF and convert it; others, especially for litho runs, ask for CMYK.
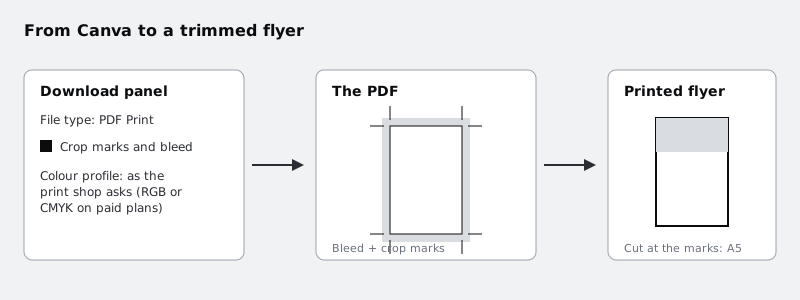
Then open Share, then Download, and set:
- File type: PDF Print.
- Crop marks and bleed: on. This adds the bleed artwork and short lines at each corner that show the printer where to cut. Crop marks only appear in the exported file, never in the editor.
- Colour profile: whatever the print shop asked for. The CMYK option is on Canva's paid plans; on the free plan, export RGB and tell the shop.
Download the file and name it clearly, for example larkfield-open-day-flyer-a5-print.pdf.
Check it worked
Open the PDF in any PDF viewer. The page is larger than A5, there are short lines at all four corners, and the photo and background run past those lines. Text and the QR code all sit well inside them. If your viewer shows document properties, the page size is larger than 148 × 210 mm: about 6 mm bigger each way with bleed alone, and more again with crop marks, because Canva adds a margin outside the bleed to hold them. Anything from roughly 154 × 216 mm upwards is expected. Send that file, along with the paper size (A5), quantity and paper weight you want, to the print shop.
Next steps
- Make matching posts for the same event, so the flyer and social channels look like one campaign: /tutorials/make-a-social-media-graphic-in-canva
- Save the clinic's colours, fonts and logo once so every flyer starts on-brand: /tutorials/set-up-a-brand-kit-in-canva
- Not sure Canva is the right tool for a larger job, such as a multi-page booklet or an app design? Compare the options: /tutorials/choose-a-design-tool-figma-penpot-framer-canva
Part of these paths
Related tutorials
- Make a social media graphic in CanvaYou will have a square post for Larkfield Clinic announcing online booking, laid out with a margin, one clear headline and a photo that stays out of the way of the text, checked at phone size and downloaded as a PNG ready to post.
- Set up a brand kit in Canva for a small businessYou will have a Canva Brand Kit holding your logo, colours and fonts, and one template for repeat posts that anyone on your team can fill in without breaking the look.
Need this done for you?
Padding does this work for growing companies, from the first diagnosis to a system that keeps working.
Get new tutorials