Figma and design tools · Beginner · 12 min
Set up a brand kit in Canva for a small business
By Padding · Updated 18 Nov 2026
Canva (web) · November 2026
You will have a Canva Brand Kit holding your logo, colours and fonts, and one template for repeat posts that anyone on your team can fill in without breaking the look.
On this page
A small business without a designer usually loses its look one post at a time. Someone picks a slightly different green, someone else uses whatever font Canva offered first, and the logo turns up stretched on a dark photo. None of it is a big mistake, but after a few months the feed looks like five different shops.
Canva's Brand Kit fixes the raw materials: your logo, your colours and your fonts sit in one place, and they appear at the top of the colour and text menus in every design. A template fixes the layout: the post someone made last week becomes the starting point for this week's, with the parts that should not move locked down.
The example here is Ashgrove Bakery, a fictional neighbourhood bakery that posts a "Bake of the week" every Monday. Swap in your own business as you go. By the end you have one Brand Kit and one template, and you have tested both by making a post from scratch.
Canva moves its buttons around from time to time. Where a label below is one Canva's help centre uses, it is named; otherwise the goal is described, so look for the nearest match in your account.
Step 1 · Check your plan and collect your brand files
Brand Kit is part of Canva's paid plans. Canva's help centre lists Pro, Teams, Enterprise, Education and Non-profit as the plans that include it, and Brand Templates (the locked, shareable kind used in Step 6) are aimed at teams. Free accounts may see a reduced version or an upgrade prompt, and what each plan allows changes, so open your account and look rather than relying on a list from someone else.
From the Canva home page, look for Brand in the left side panel. If it opens a page where you can add a Brand Kit, you are ready. If it asks you to upgrade, decide that now, before you collect anything.
Then put these in one folder on your computer:
- Logo files. The main logo as a PNG with a transparent background. An SVG too if your designer gave you one, because it stays sharp at any size and suits print. A version that works on dark backgrounds (often an all-white version). A square icon or monogram if you have one, for profile pictures.
- Colour codes. The hex values, such as
#2F5D50. If all you have is a printed menu or an old sign, ask whoever made it, or match a colour from the logo file later. - Font names. The exact names of the fonts used on your sign, menu or website. If you have font files you are licensed to use (
.otf,.ttfor.woff), put them in the folder as well.
For Ashgrove Bakery the folder holds ashgrove-logo.png, ashgrove-logo.svg, ashgrove-logo-white.png, ashgrove-icon.png and a note with four colours and two font names.
Check it worked
You can open the Brand page in Canva without an upgrade prompt, and your folder has at least one logo PNG, a list of hex codes and the names of no more than two or three fonts.
Step 2 · Decide what each colour and font is for
A Brand Kit with eight colours and no rules does not keep anyone consistent. Before you type anything into Canva, give each colour and font one job. Write this down in a note; you will use it in Step 3 and again when you build the template.
For colours, four roles cover most small-business posts:
- Main colour: the one people should remember. Backgrounds of headline posts, buttons on graphics.
- Dark text colour: nearly black, for body text on light backgrounds. Pure black is fine; a very dark version of your main colour often looks warmer.
- Light background colour: off-white or a pale tint, for text-heavy posts.
- Accent colour: used sparingly, for a price, a date or a "New" badge.
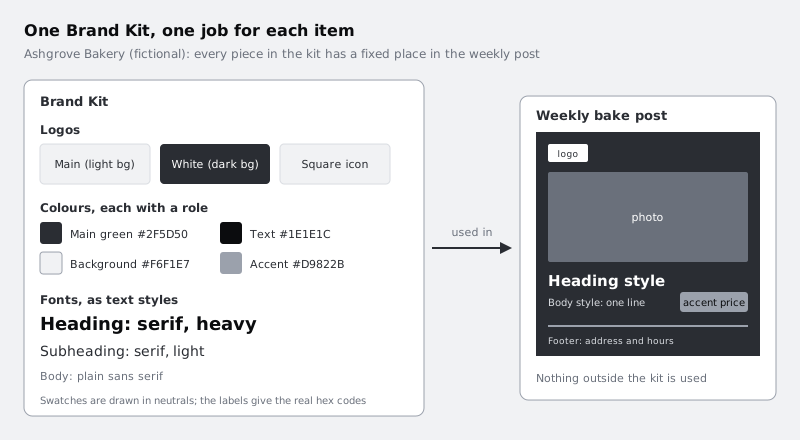
Ashgrove's note reads: main #2F5D50 (deep green), text #1E1E1C, background #F6F1E7 (flour white), accent #D9822B (crust orange).
For fonts, pick at most two families: one for headings with some personality, one plain and readable for everything else. Canva's Brand Kit lets you set separate text styles, typically for a heading, a subheading and body text, so plan which family and roughly which weight goes in each.
Check contrast now rather than after you have published 30 posts. Any free contrast checker will do: put your dark text colour on your light background, then white text on your main colour. Aim for a ratio of at least 4.5 to 1 for normal-sized text.
Check it worked
Your note lists every colour with a role next to it and every font with the text style it will fill. White on your main colour and your text colour on your background both pass 4.5 to 1 in a contrast checker. If one fails, darken the colour now.
Step 3 · Create the Brand Kit and add logos and colours
Open Brand from the home page and add a new Brand Kit. Name it after the business, for example "Ashgrove Bakery", so nobody confuses it with a kit from a client or a side project.
Canva can also build a kit for you from your website or a PDF of your brand guidelines. That is a reasonable starting point if you have either, but check everything it pulls in against your note from Step 2: it will happily include a colour from a stock photo on your homepage.
Logos. Upload each file from your folder into the logos section. Upload the light-background and dark-background versions separately so they sit side by side; whoever builds a post can then pick the one that suits the photo. If Canva lets you name or describe each logo, use plain names like "Main logo, for light backgrounds".
Colours. Add a palette and give it a name such as "Core colours". Add each hex code from your note, in the order main, text, background, accent. Where Canva lets you name individual colours, use the role: "Main green", "Text", "Background", "Accent orange". Names stop people guessing which green is the right one.
If you also have colours for a seasonal campaign, put them in a second, separately named palette ("Christmas 2026") so they do not creep into everyday posts.
Check it worked
Open any design, select a shape and open the colour menu. Your Brand Kit palette appears with your colours in the order you set. The logos section of the kit shows each logo file once, with the dark-background version visible on its own.
Step 4 · Add fonts and set text styles
In the fonts section of the Brand Kit, set the heading, subheading and body styles from your note. For each one choose the font family, and where Canva offers it, the weight and a default size.
If your font is in Canva's library, search for it by name. If it is not, upload the font file from your folder, but only if your licence covers it: a font bought for your printed menu does not always allow use in other software. When you cannot upload it, pick the closest match from Canva's library and write that substitute into your note so everyone uses the same one.
For Ashgrove: heading in a rounded serif at a heavy weight, subheading in the same serif at a lighter weight, body in a plain sans serif.
Keep sizes as a starting point, not a rule for every format. A heading that suits a square post will be too large for a slide.
Check it worked
Create a new blank social post. Open the text options in the side panel. Your brand text styles appear as heading, subheading and body, and clicking each one adds text in the font and weight you chose.
Step 5 · Build the repeat post from your kit
Now make the post you will reuse. Create a new design at the size of the place you post most often; Ashgrove posts square images to Instagram, so they choose the Instagram post size.
Build it only from the Brand Kit. Every colour comes from the brand palette in the colour menu, every text box from a brand text style, and the logo from the logos section. If you reach for the colour picker or a font you did not plan, stop: either the kit is missing something or the design is drifting.
Lay out the parts that change and the parts that do not:
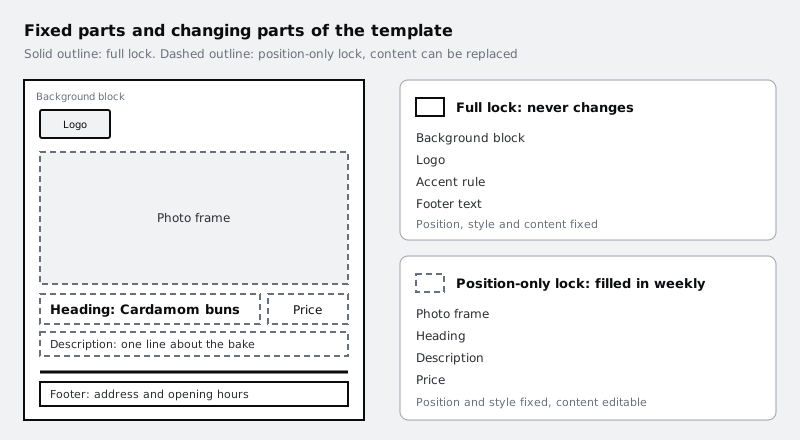
- Fixed: the background colour block, the logo in one corner, a small line of footer text (address or opening hours), a thin accent rule.
- Changes each week: a photo frame, the heading ("Cardamom buns"), one line of description, the price.
Fill the changing parts with real sample content, not "Lorem ipsum", so you can see whether a long product name still fits. Try the longest name you are likely to use, and shorten the heading style or widen the box if it wraps badly.
Check it worked
Select each element in turn. Every colour is one of your named brand colours, every text box uses a brand text style, and the logo comes from the kit. The post still looks right with your longest likely product name in the heading.
Step 6 · Lock the fixed parts and save it as a template
Locks stop the fixed parts being moved or restyled by accident. Canva has two kinds:
- A full lock fixes an element's position, style and content. Use it for the logo, the background block, the accent rule and the footer text.
- A position-only lock fixes position and style but leaves the content editable. Use it for the heading, description, price and photo frame, so people can type the new bake and drop in a photo without nudging the layout.
Select an element and use Lock in the floating toolbar above it, choosing the kind of lock you need. Set every lock before you publish, because the template is copied as it is when you publish it.
To turn the design into a Brand Template, open Share at the top of the editor, choose See all to show more options, then choose Brand Template. Give it a name people will search for, such as "Weekly bake post (Instagram)", and add it to your Brand Kit or brand folder if Canva asks where it should live.
If your plan does not offer Brand Templates, you can still keep a master copy: name the design "MASTER: Weekly bake post", keep the locks, and tell everyone to make a copy of it each week instead of editing it directly. It is less protected, because anyone with edit access can unlock elements, but it gets most of the benefit.
Brand Templates are meant for people inside your Canva team. When an outside partner needs to see a post, make a design from the template and share that as view-only.
Check it worked
Your template appears under Brand Templates (or your master copy sits in a clearly named folder). Open it as a new design and try to drag the logo: it does not move. Click the heading: you can type over it, but you cannot drag it out of place.
Step 7 · Test it by making next week's post
A template is only finished when someone else can use it without asking you questions. Make the next post yourself, as if you were new, and if you can, ask a colleague to make one too.
Start a new design from the template, not from last week's post. Change the heading, description and price, swap the photo, and download it. For Ashgrove: "Rye and fennel loaf", one sentence about the flour, the price and a new photo.
Note anything that made you stop. Common fixes:
- The photo frame crops faces or food badly: make it larger or change its shape.
- People want a second colour for the price: decide whether the accent covers it or add it to the kit with a role.
- Someone could not find the template: rename it with the word they searched for.
Make the change in the original, check the locks are still in place, and publish it again so the next post uses the new version.
Check it worked
You have a new post made from the template, downloaded and ready to schedule, and placing it next to the original post shows the same logo position, colours, fonts and footer. If a colleague made one, theirs matches too.
Next steps
You now have the parts that keep a small business looking like itself: a Brand Kit with named colours and fonts, and a locked template for the post you make most often.
- Make a social media graphic in Canva covers sizing, image choice and text on photos for one-off posts built from the same kit.
- Make a slide presentation in Canva uses the same brand text styles for a ten-slide talk.
- Choose between Figma, Sketch, Adobe XD, Penpot, Framer and Canva helps when your needs grow beyond graphics into product screens or a website.
Part of these paths
Related tutorials
- Make a social media graphic in CanvaYou will have a square post for Larkfield Clinic announcing online booking, laid out with a margin, one clear headline and a photo that stays out of the way of the text, checked at phone size and downloaded as a PNG ready to post.
- Make a slide presentation in CanvaYou will have a finished ten-slide Canva deck built from a written outline, with one idea per slide, text sized to read from the back of a room, three repeated layouts and speaker notes, ready to present or download.
Need this done for you?
Padding does this work for growing companies, from the first diagnosis to a system that keeps working.
Get new tutorials