Figma and design tools · Beginner · 13 min
Override instances without breaking the main component
By Padding · Updated 18 Nov 2026
Figma (web) · November 2026
You will have Larkfield Clinic screens whose appointment cards carry their own text, colour and nested-instance overrides yet still pick up every other change from the main component, and you will know when to reset and why not to detach.
On this page
An instance is a live reference to a main component. Every change you make to an instance is stored as an override: a note that says "on this one copy, this property has this value instead". Overrides are how one Appointment card component can show a child immunisation on Home and a 14:15 slot on Booked. They are also how a file quietly drifts away from its components, until a fix to the main component arrives on some screens and not others.
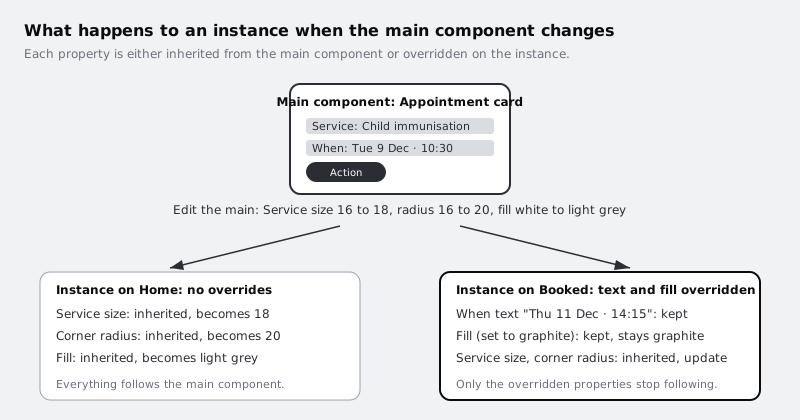
The rule that explains almost everything is simple. Figma tracks overrides property by property. A property you have overridden on an instance stops following the main component. Every property you have not touched keeps following it. Detaching goes further and cuts the link for every property at once.
In this tutorial you make each kind of override on the Larkfield Clinic cards, predict what an edit to the main component will do, check the prediction, then clean up with reset. By the end, each screen still updates from the main component, and the only differences are the ones you meant.
Step 1 · Set up a clean starting point
Open the Larkfield Clinic file. Start from instances with no stray changes, so you can tell your overrides apart from old ones.
Select the Appointment card instance on Home. In the right sidebar, the instance section at the top names Appointment card as its component. Open the More actions menu (the three dots) in that section and look at the Reset submenu. If it lists any properties, choose Reset all changes. Do the same for the instances on Pick a time and Booked.
If you followed /tutorials/make-your-first-figma-component, Booked has a When override from that tutorial. Reset it too; you will put it back on purpose in the next step.
Finally, put the Components page and the screens where you can see both. The quickest way is to open the same file in a second browser tab, with the Components page in one and the screens page in the other.
Check it worked
All three cards show the same text as the main component. Selecting any of them and opening More actions shows no individual properties to reset. Depending on your version, the Reset option may be greyed out or the submenu may not appear at all.
Step 2 · Override text on one instance
Text is the override you will make most often, and the safest.
On Booked, double-click into the instance until the When layer is selected, then double-click again to edit the text. Type Thu 11 Dec · 14:15. On Pick a time, change the Service text to Blood test.
Now change a text property rather than the words. On Booked, with When selected, set the weight to bold in the typography section of the right sidebar. This is a second, separate override on the same layer: one for the characters, one for the weight.
Note what you have done in a sticky note or a text layer next to the screens. A short list is enough:
- Booked, When: text, weight
- Pick a time, Service: text
You will use this list to predict what survives the next edit to the main component.
Check it worked
Select the When layer inside the Booked instance and open the Reset submenu from More actions. It lists separate entries for the text content and the font, with names something like Text and Font. The Home card still shows the main component's date in its normal weight.
Step 3 · Override a colour, and know when not to
Colour overrides are allowed, but they are where drift usually starts. Before you change a fill, ask whether the colour means something. A card that turns graphite because the appointment is confirmed is a state, and states belong in the main component as a variant or property so every screen uses the same one. A card that is graphite only on this one marketing screen is a fair override.
For this exercise, treat Booked as a one-off. Select the Booked instance (the whole card, not a layer inside it) and change its fill to graphite, #2A2D33. Change the Service and When text to white so they stay readable. That is three more overrides: one fill and two text colours.
Add them to your list:
- Booked, card: fill
- Booked, Service and When: text colour
If you find yourself making the same colour override on a second or third instance, stop and put it in the main component instead. Overrides that repeat across screens are a sign that the component is missing an option.
Check it worked
Booked shows a dark card with white text. Home and Pick a time are unchanged. Your list records six overrides across two instances.
Step 4 · Swap a nested instance
If your card's Action button is itself an instance of a Button component (as in /tutorials/build-a-button-component-with-variants), it is a nested instance, and you can swap or switch it without touching the card's structure.
Select the Action button inside the Home card. The right sidebar shows the button's own instance section. If the button has variants, switch it from Primary to Secondary there. If you have an icon component inside the button, you can also swap it for another icon using the instance swap control in the same section.
Swapping keeps your other changes only when the layers line up. Figma carries text and other overrides across a swap or variant switch when the layer names match between the old and the new component (for text, the hierarchy should be similar too). This is why consistent layer names matter: a button whose label layer is called Label in one variant and Text in another loses its label override when you switch.
Add the swap to your list:
- Home, Action: variant (Secondary)
If your Action button is a plain frame rather than an instance, skip the swap and note that the card has no nested instances. You can come back to this step after building a button component.
Check it worked
The Home card shows a secondary button, and its label still reads the same as before the switch. Selecting the button shows its instance section with Secondary as the chosen value.
Step 5 · Predict, then edit the main component
This is the step that teaches the rule. Before you edit anything, write a prediction next to each entry in your list: kept or replaced. Then make three edits to the main Appointment card on the Components page:
- Change the Service text size, for example from 16 to 18.
- Change the corner radius of the card, for example from 16 to 20.
- Change the card fill from white to a light grey such as
#F1F2F4.
Go back to the screens and compare the result with your predictions.
- Home has no property overrides on its text or fill. It takes all three changes. Its button stays Secondary, because that variant choice is an override of its own.
- Pick a time overrode the Service words, not the size. It shows
Blood testat the new, larger size. Words and size are separate properties. - Booked overrode the fill, so it stays graphite instead of turning light grey. It still takes the new corner radius and the larger Service text, because you never touched those.
If your predictions were right, you understand overrides. If one was wrong, it is almost always because you assumed an override covered more than one property.
There is one case to remember. If you delete or restructure a layer in the main component, any override stored on that layer has nothing left to attach to. Rename and rearrange layers in the main component early, before instances spread across the file.
Check it worked
Booked is dark with rounder corners and larger Service text. Pick a time shows Blood test at the new size. Home is light grey with rounder corners. Every entry on your list matches what you see.
Step 6 · Change what overrides cannot
Some changes are not available on an instance at all. You cannot reorder layers, move a layer to a new position inside the card (including moving items within auto layout), change constraints, or change the bounds of a text layer. You can hide a layer, but not delete it.
Try one to see the limit. On Pick a time, try to drag the Clinician layer above Service inside the instance. Figma does not let it move.
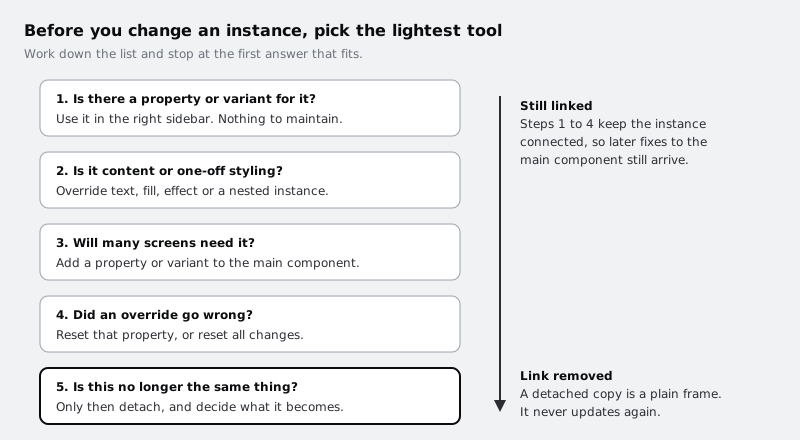
When a screen needs a different structure, you have three options, in order of preference:
- Add an option to the main component. If some screens need the clinician first, add a variant or a boolean property that shows a different arrangement. Every instance can then use it, and it stays linked.
- Hide what you do not need. If the screen only needs fewer parts, hide layers on the instance. Hiding is an override like any other.
- Push the change to the main component. If your instance edit should apply everywhere, select the instance and choose Push changes to main component from More actions. This only works when the main component is in the same file, not for a component from a library or one nested inside another component.
Check it worked
The Clinician layer on Pick a time is still under Service. If you added a property or hid a layer instead, the instance section in the right sidebar shows it, and the instance icon in the layers panel is still a hollow diamond.
Step 7 · Reset what you no longer want
Reset is the undo for overrides, and it is targeted. You can clear one property and keep the rest.
Decide that Booked should go back to the standard card colour but keep its date. Select the Booked instance, open More actions, and in the Reset submenu choose the fill entry only. The card turns light grey from the main component. Then select the Service and When layers in turn and reset only their colour. Figma treats text colour as a fill, so look for the fill entry rather than one named for text colour. The text becomes readable again on the light card.
Leave the When text and weight overrides in place. They are content, which is what overrides are for.
On Home, reset the Action button's variant if you do not want the secondary style there. Select the button and reset it from its own instance section.
Cross each reset entry off your list. What remains is the set of overrides you mean to keep.
Check it worked
Booked is light grey with dark text and still reads Thu 11 Dec · 14:15 in bold. Selecting its When layer, the Reset submenu still offers the text and font entries, and no fill entry remains on the card. Change the main component's fill once more and Booked follows it.
Step 8 · Detach only when the thing has really changed
Detaching (right-click the instance and choose Detach instance, or Option Command B on Mac and Ctrl Alt B on Windows) turns the instance into a plain frame. It keeps how it looks today and never receives another change from the main component. There is no option to reconnect it later.
That makes detaching the wrong answer for nearly every problem people use it for:
- "I need different text or colour": override it.
- "I need a different arrangement": add a variant or property to the main component.
- "It looks wrong after an update": reset the overrides that caused it.
Detach only when the thing on the screen is no longer an appointment card, for example when you are sketching a new kind of card and want to start from the old one. Even then, turn the result into a new component straight away, so you do not leave a loose copy that drifts on its own.
Check it worked
In the layers panel, the Appointment card layers on Home, Pick a time and Booked all show the hollow diamond instance icon, not a frame icon. Select each one and the right sidebar names Appointment card as its component. Make one last visible change to the main component, such as the Action label, and confirm all three screens pick it up.
Next steps
Your cards now differ only where you intended, and every other change still reaches them from one place. To give screens choices without overrides, add component properties in /tutorials/add-component-properties-in-figma and variants in /tutorials/build-a-button-component-with-variants. When other files need the same cards, move them into a library with /tutorials/publish-and-update-a-figma-team-library, where the same override rules decide what survives each library update.
Part of these paths
Related tutorials
- Make your first component and use its instancesYou will have one appointment card component in the Larkfield Clinic file, with instances on three screens that all change when you edit the main component.
- Publish a team library and push updates to other filesYou will have the Larkfield Clinic components in their own library file, used by the booking app file, with one published change reviewed and accepted on the other side.
Need this done for you?
Padding does this work for growing companies, from the first diagnosis to a system that keeps working.
Get new tutorials