Figma and design tools · Advanced · 18 min
Prototype a booking form with variables and conditional logic
By Padding · Updated 18 Nov 2026
Figma (web) · November 2026
You will have a one-frame Figma prototype of a booking form that remembers the chosen time, refuses to book until every field is filled, and shows a confirmation summary built from what the tester picked.
On this page
A click-through prototype is a set of frames joined by arrows. Every tester sees the same thing in the same order, whatever they tap, because nothing in the file knows what happened before. That breaks down on forms. A tester picks 15:00, but the confirmation screen says 11:30 because that is what you typed when you drew it. A tester skips the phone field and the form books anyway. To fake either case you would need a frame for every combination of choices.
Variables give the prototype a memory. A Set variable action writes a value when someone clicks. Text and visibility bound to those variables update straight away. A Conditional action reads the values and decides what happens next. Put the three together and one frame can stand in for an empty form, a form with an error and a confirmation screen.
This tutorial builds that frame for a simple appointment booking form: three time slots, a name field, a phone field and a Book button. It is the step from prototypes that follow a script to prototypes that respond to the person using them.
Step 1 · Write down the states and the variables behind them
Before opening Figma, list what the form must remember and what it must show. Each thing it remembers becomes a variable. Each thing it shows or hides is a layer bound to one. Write this list in a note or on the canvas beside where the frame will go:
slot, string, starts asNone: the time the tester picked.summary, string, starts asTime: None: the live line under the fields.name, string, starts asYour name: the text in the name field.phone, string, starts asPhone number: the text in the phone field.confirmation, string, starts empty: the text on the confirmation panel.hasSlot, boolean, starts false: has a time been picked.hasName, boolean, starts false: has the name field been filled.hasPhone, boolean, starts false: has the phone field been filled.showError, boolean, starts false: show the "fill in every field" message.editing, boolean, starts true: show the form.booked, boolean, starts false: show the confirmation panel.
Two of these look redundant, and the reason matters. You can only bind visibility to a variable, not to an expression, so "show the form when not booked" needs its own editing variable that is true when booked is false. The has booleans duplicate information you could get by comparing strings (name != "Your name"), but booleans keep the conditional short and readable, and the list states the intent plainly.
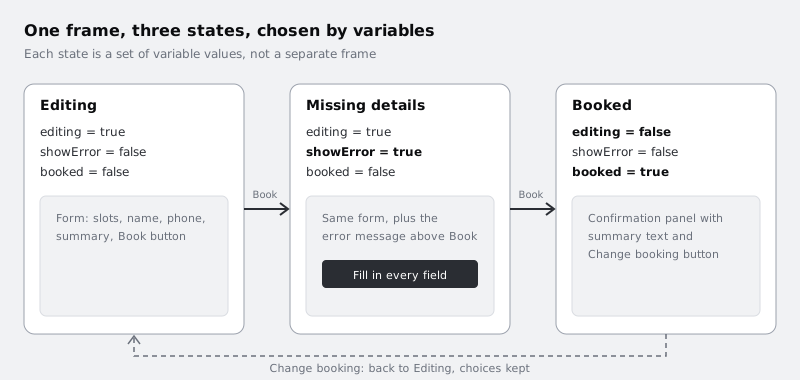
Check it worked
Your note has eleven variables, each with a type and a starting value. Read across the three states in the diagram and confirm every one can be described only with values from your list. If a state needs something that is not in the list, add the variable now.
Step 2 · Create the variable collection
Open the file and click an empty part of the canvas so nothing is selected. In the right sidebar, open the local variables. Create a new collection and name it Booking form. Keeping prototype state in its own collection stops it mixing with colour or spacing tokens.
Add each variable from your list with the matching type and starting value. For string values, type the text without quotation marks in the value cell (quotation marks are only needed later, inside expressions). Leave confirmation empty.
Add a short description to editing and booked, such as "Always opposite of booked". You will forget why there are two by next month.
Check it worked
The Booking form collection shows eleven variables. The type icon beside each one matches your list: five strings (slot, summary, name, phone, confirmation) and six booleans. editing is the only boolean set to true.
Step 3 · Build one frame with a form group and a confirmation group
Create a phone-sized frame called Booking. Inside it, build two groups (auto layout frames work well) and give both the full width of the screen:
Form: a heading, three chips labelled 09:00, 11:30 and 15:00, a name field, a phone field, a summary line, an error message reading "Fill in every field to book", and a Book button.Confirmation: a heading such as "You are booked", one text layer for the details, and a secondary button labelled Change booking.
Place Confirmation at the same position as Form, over the top of it. Overlapping is fine because only one is ever visible. If you use auto layout for the frame itself, turn on absolute position for Confirmation so it does not push the form down.
Make the name and phone fields look like inputs, with a single text layer each for the placeholder. Figma prototypes do not take typed input in this setup, so tapping a field will fill it with sample text instead. Tell testers this in your test script.
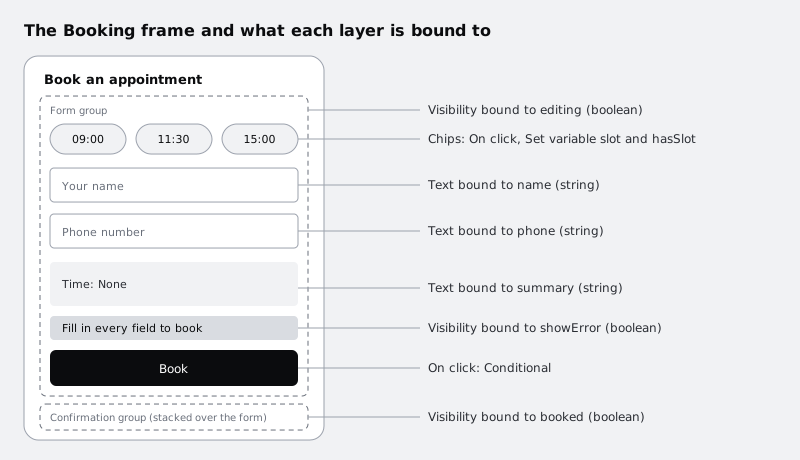
Check it worked
The layers panel shows Booking with exactly two children, Form and Confirmation. Hide Form with the eye icon and the confirmation panel sits where the form was, with no gap above it. Show Form again before moving on.
Step 4 · Bind text and visibility to the variables
Bindings are how the frame reads the variables. Work through the layers:
- Select the summary text layer. In the right sidebar, apply the
summaryvariable to its text content. The layer now readsTime: None. - Bind the name field's text layer to
nameand the phone field's text layer tophone. - Bind the confirmation details text to
confirmation. It goes blank, which is expected. - Select the error message. In the Appearance section, right-click the hide control and choose
showError. The message disappears from the canvas becauseshowErrorstarts as false. - Bind the visibility of
Formtoeditingand ofConfirmationtobookedin the same way.
A bound property shows the variable name in a pill instead of a plain value. If a text layer still shows its old wording, the binding went on the wrong layer, often a parent frame instead of the text itself.
Check it worked
On the canvas, the form is visible, the confirmation panel is hidden, the error message is hidden and the summary reads Time: None. Open the Booking form collection and change editing to false: the form disappears. Set it back to true.
Step 5 · Record choices with Set variable actions
Now make clicks write values. Switch to the Prototype tab in the right sidebar.
Select the 09:00 chip and add an interaction with the On click trigger. Set the action to Set variable, Target slot, Value "09:00", with the quotation marks because this is a string written as an expression. Click Add action and add two more Set variable actions:
- Target
hasSlot, Value true. - Target
summary, Value"Time: " + slot.
Order matters. Actions run from top to bottom, so summary must come after slot or it will join the old value. Repeat for 11:30 and 15:00 with their own times.
Select the name field and add an On click interaction with two Set variable actions: name to "Ada Okafor" and hasName to true. Do the same for the phone field with "07700 900123" and hasPhone. Any obviously fictional sample values will do.
If you want the selected chip to look selected, make the chip a component with Default and Selected variants and bind each instance's variant to a variable. That is a refinement; the summary line already proves the slot is remembered.
Check it worked
Click the 15:00 chip and open its interaction. You see three actions in this order: slot, hasSlot, summary. None of the Value fields is outlined in red, which Figma uses to mark an invalid expression. Each field has two actions.
Step 6 · Guard the Book button with a conditional
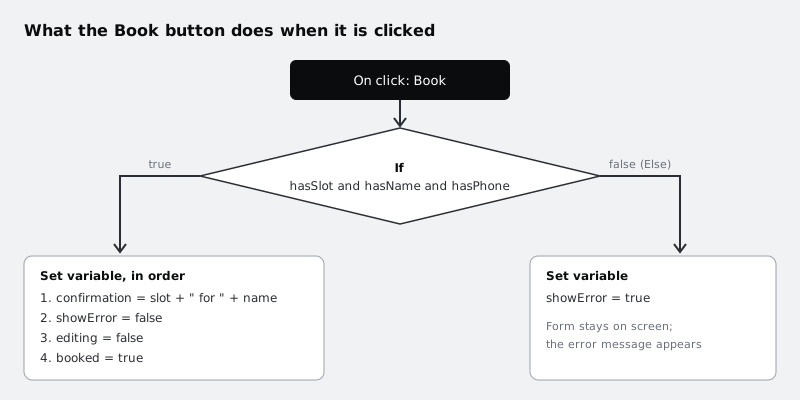
Select the Book button and add an On click interaction. Set the action to Conditional. In the If field, type:
hasSlot and hasName and hasPhoneIn the If branch, add four Set variable actions, in this order:
confirmationtoslot + " for " + nameshowErrorto falseeditingto falsebookedto true
In the Else branch, add one Set variable action: showError to true.
Building confirmation at the moment of booking, from the stored values, is what makes the confirmation honest. Whatever the tester chose is what they see, with no extra frames.
Check it worked
Open the Book interaction. It shows one Conditional with an If branch of four actions and an Else branch of one. The condition is not outlined in red. If it is, check the spelling of each variable name and that you used the word and, not &&.
Step 7 · Add a way back that keeps the choices
Real people change their minds. Select Change booking on the confirmation panel and add an On click interaction with two Set variable actions: booked to false, then editing to true.
Do not reset slot, name or phone. The form reappears with the earlier choices still in it, which is the behaviour a tester would expect from a real app and the clearest proof that state is being kept.
Also add one Set variable action to every chip and both fields: showError to false. Once a tester starts fixing the form, the old error should go away.
Check it worked
The Change booking interaction has exactly two actions. Every chip and both fields now end with a showError action, so the chips have four actions each and the fields three.
Step 8 · Test every path in the presentation view
Select the Booking frame, make sure it is a starting point for the flow, and open the presentation view. Run these three paths and note the result of each:
- Click Book straight away. The error message appears and the form stays.
- Click 11:30, then the name field. The summary reads
Time: 11:30and the error goes away. Click Book: the error comes back, because the phone is missing. - Click the phone field, then Book. The confirmation panel shows
11:30 for Ada Okafor. Click Change booking: the form returns with 11:30 and both fields still filled. Pick 09:00 and book again; the confirmation now says 09:00.
To repeat a run from the starting values, restart the prototype from the presentation view. If something misbehaves, the cause is almost always one of three things: actions in the wrong order, a string value missing its quotation marks, or a visibility bound to the wrong group.
Check it worked
All three paths behave as listed without leaving the Booking frame. In your note, the three runs are ticked off. The prototype covers the empty form, two kinds of incomplete form, a confirmed booking and an edited booking, all from one frame.
Next steps
- Make the chips show their selected state with interactive components in /tutorials/build-interactive-components-for-prototypes.
- Revisit how number variables work outside prototypes in /tutorials/use-number-variables-for-spacing-and-radius.
- Prepare this prototype for a session with real people using /tutorials/get-a-prototype-ready-for-testing.
- Compare it with a frame-to-frame flow in /tutorials/build-a-click-through-prototype-in-figma.
Part of these paths
Related tutorials
- Use number variables for spacing and corner radiusYou will have a card and a list screen in Figma whose gaps, padding and corner radius all come from number variables, so changing one value in the variables table restyles every card at once.
- Make components respond to hover and tap with interactive componentsYou will have a time-slot chip that toggles when tapped and a button that shows hover and pressed states, wired once inside their component sets so every instance in every prototype behaves the same way.
- Build a click-through prototype in FigmaYou will have the six high-fidelity Larkfield Clinic screens linked into a named Figma flow that plays from Home to Booked on a phone-sized device, with a link you can send to a colleague.
Need this done for you?
Padding does this work for growing companies, from the first diagnosis to a system that keeps working.
Get new tutorials