Figma and design tools · Intermediate · 16 min
Revise the design after a prototype test
By Padding · Updated 18 Nov 2026
Figma (web) and a spreadsheet · November 2026
You will have a revised Larkfield Clinic prototype that fixes the worst problems from the first test, a page that shows each change before and after beside its evidence, and a change log that tells the second round of testing what to watch.
On this page
A test that ends in an issue log has done half its job. The other half is deciding which problems to fix, changing the design for those, and being able to say afterwards exactly what changed and why. Teams skip that last part more than any other. Three weeks later someone asks why the Confirm screen has a new link on it, nobody remembers, and the second round of testing checks nothing in particular.
This is part 10, the last part of the series that takes the Larkfield Clinic booking app from paper to a tested design. Part 9 left you with an issue log in a spreadsheet: one row per problem, each marked Design, Prototype or Unsure, each linked to the frame where it happened, and each with a comment pin in the Figma file. Here you rank those rows, fix the few that matter most, and keep the old and new screens next to each other with the evidence for every change. You finish with a prototype ready for a second round and a change log that says what that round needs to find out.
The example log below comes from five sessions (P1 to P5) on the three part 9 tasks: book a nurse appointment for a dressing next Tuesday morning, change the time to after 11 before confirming, and find out when the reminder comes. Use your own rows if you have them; the method does not depend on the clinic.
Step 1 · Rate the design rows and set the prototype rows aside
Open the Issue log tab. Filter it by Kind and deal with the two groups separately, because they answer different questions.
Prototype rows say the prototype got in the way, not the design. They are never ranked against design problems. Read each one and decide only whether it must be fixed in the prototype before round 2, because it disrupted the test, or whether it is a known limit you keep explaining in the session introduction. For Larkfield:
- L06, Your details: P2 tapped the pre-filled phone field. Known limit; it stays in the briefing. No change.
- L07, Pick a time: two people tapped the Continue button and nothing happened, because the interaction sat on the text label inside the button, not on the button instance. This wasted session time. Fix it in step 5.
For Design and Unsure rows, add three columns to the log, Frequency, Impact and Recovery, then a Severity column. Rate each row with the scale from Rate and prioritise usability problems by severity: how many of the five hit it, how badly it affected the worst-hit person, and whether that person got back on track alone. The rule there turns the three into a level from 1 Minor to 4 Critical. If you have not used that tutorial, read its scale step first; it takes ten minutes and makes the ranking something a colleague can repeat.
Leave Unsure rows unrated. You do not yet know whether they are design problems, so a severity would be a guess. Instead each one gets a way to find out in round 2.
The Larkfield rows, rated:
ID   Frame             Frequency  Impact    Recovery  Severity
L03  Confirm           Some 2/5   Blocked   Unaware   4 Critical
L01  Choose a service  Most 3/5   Slowed    Alone     3 Serious
L05  Booked            Most 3/5   Bothered  Alone     2 Moderate
L08  Your details      Few 1/5    Bothered  Alone     1 Minor
L04  Pick a time       Unsure: settle in round 2
L03 is the one to look at. Only two people hit it, but P3, on Confirm / Nurse 10:30, tapped Change beside the time, landed on Not part of this test, tapped Go back, did not notice Confirm still said 10:30 and confirmed. They left believing they had an 11:15 appointment. That silent wrong booking is why it outranks L01, which more people hit but everyone recovered from.
Check it worked
Every Prototype row says either "fix before round 2" or "known limit", with no severity. Every Design row has the three factors and a severity written as a number and a name. Every Unsure row has no severity and a note saying how round 2 will settle it.
Step 2 · Draw the cut line and write a change card for each fix
Sort the Design rows by severity, highest first. Now decide how many you will fix before round 2. The limit is not your ambition; it is what round 2 can check. Every change you make is something the next sessions must watch, and a five-person round can watch three or four changes properly. Change ten things and you will not know which change helped.
A workable rule for a small team: fix every Critical and Serious row, then add Moderate rows only if the fix is a copy change or a single element. Everything below the line stays in the log with a reason, so nobody thinks it was forgotten.
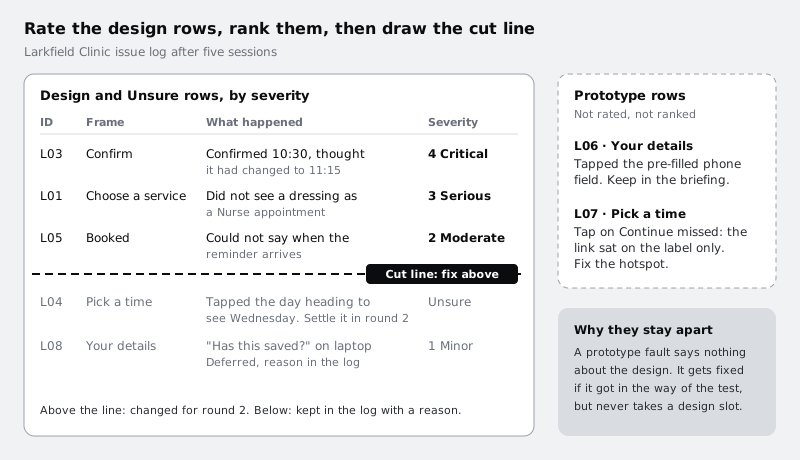
For Larkfield the line falls under L05: L03 and L01 by rule, and L05 because its fix is one sentence. L08 is deferred; one person on a laptop, and the fix (a saved state on each field) belongs to the build more than to the screens.
Add a tab called Changes to the spreadsheet. Give each fix one row, a change card, with these columns:
ID: the issue ID, so the card and the log row stay joined.Evidence: what was seen, with P numbers, copied fromWhat happened. No opinions.Change: what you will alter, in one or two sentences, naming frames and components.Expect in round 2: what people should do differently if the change works. Write something you could see, not a feeling.Watch: which task and which moment the note-taker must look at.Status:Plannedfor now.
The L03 card:
ID:         L03
Evidence:   Task 2. P1 went back twice before finding the time again.
            P3 tapped Change by the time, hit the dead end, went back,
            did not see Confirm still said 10:30, confirmed and
            said "11:15, done".
Change:     The Change link beside the date and time on Confirm, a
            dead end in round 1, opens Pick a time with the current
            slot selected. The time on Confirm gets the Heading/M
            style so it is read first.
Expect:     Everyone in task 2 checks or changes the time from Confirm,
            and nobody confirms a time they did not mean.
Watch:      Task 2, the moment they arrive on Confirm.
Write the card before you open Figma. If you cannot fill Expect in round 2, the change is a guess, and you should say so in the card or reconsider it.
Check it worked
The Changes tab has one row per fix above the line, and each row's ID matches a log row. Each Expect in round 2 cell describes an action a note-taker could tick off. Each issue below the line has a short reason in the log, such as Deferred: 1 of 5, laptop only, build behaviour.
Step 3 · Copy the tested screens to a revisions page
You are about to change the frames the prototype plays. Before you do, keep a copy of each one you will touch, so the before and after can sit side by side. Part 8 saved the whole tested file as the named version Test build, round 1, so nothing can be lost; the copies are for comparing at a glance without opening version history.
Add a page called 10 Revisions. On it, make one section per change card: choose the Section tool (Shift S) and draw a section wide enough for three phone frames, then name it after the card, such as L03 · Confirm · 4 Critical. Sections give each change a labelled area you can link to and move as one piece.
Go to the page with the tested frames. Select the frames each change will touch, copy them, and paste them into the left side of that change's section. For Larkfield:
L03:Confirm / Nurse 10:30andPick a time / Nurse Tuesday, the copies part 9 made for these tasks.L01:Choose a service.L05:Booked.
Rename each copy with a suffix, Confirm – round 1, so no copy can be mistaken for a live frame. The copies are a record, not part of the prototype; prototype flows play frames from their own page, so nothing on 10 Revisions shows up in the test link.
Check it worked
10 Revisions has three sections named after the change cards, and each holds the round 1 frames that change will touch, with – round 1 at the end of every frame name. The page with the live frames is unchanged and the prototype still plays from Home.
Step 4 · Make the changes in components first, then screens
Now edit the live frames, on the page the prototype plays. Make each change at the highest level it lives at. If the thing you are changing comes from a component, change the main component and let the instances follow; editing one instance leaves every other screen and state frame still showing the old design, which round 2 will then trip over.
L01, Choose a service. The service rows are instances of a list row component with a title and a duration caption. Open its main component and add a second text line under the title for a short description. Give it a text property, as in Add component properties in Figma, so each instance can carry its own words. Then fill in the five instances on Choose a service:
- Nurse appointment:
Dressings, injections, blood pressure - Blood tests:
Tests your GP has asked for - Travel health:
Jabs and advice before a trip abroad - Child check-up:
Routine checks and jabs for under 16s - GP appointment:
New or ongoing health problems
Write the descriptions in the words people used in the sessions. P2 said "dressing", so "dressings" goes first.
L03, Confirm. The Change link to the right of the date and time has been on Confirm since part 2, but in round 1 it led to Not part of this test. Keep it, in colour/accent like the other Change links. Apply Heading/M to the time so it is the first thing read. If the summary is a component, change the main component; if per-task copies of Confirm exist, check that every copy shows the link.
L05, Booked. Replace the vague reminder line with one that answers the task: We will text you at 9am the day before. Keep it in the same text layer, so the Smart animate pairing from part 7 between Booked and Booked – details still matches by name. If the card on Booked – details repeats the line, change it there too.
After each change, open every state frame of the same screen, such as Pick a time / Time gone or Confirm / Could not book, and check it shows the new design.
Check it worked
Choose a service shows five rows, each with a title, a description in the words above and a duration. Every other frame using the list row component shows the description line without you touching it. Confirm and all its copies have a Change link beside the time. Booked gives the reminder time in one sentence. The layer names inside the appointment card on Booked are the same as before.
Step 5 · Rewire the prototype for the changes
A new element that looks tappable is a dead end until it is linked, and a dead end on a fix will show up in round 2 as a new problem. Switch the right sidebar to the Prototype tab.
- The Change link (L03). Select
Changebeside the date and time onConfirm / Nurse 10:30, delete its connection toNot part of this test, and connect it toPick a time / Nurse Tuesday, with Navigate to and the transition you use for going back a step. Do the same onConfirm / Nurse 11:15. - The Continue hotspot (L07). On
Pick a time, select the interaction on the text label inside Continue and delete it. Select the whole button instance, not the label, and connect it toYour details. The whole button is now the hotspot. Check the other primary buttons for the same fault; if one has it, they may all have it. - Settling L04. L04 was
Unsure: people tapped the day heading onPick a time, and nobody could tell whether they wanted another day or were confused by the prototype only having Tuesday. Make round 2 able to tell. DuplicatePick a time / Nurse TuesdayasPick a time / Nurse Wednesdaywith Wednesday's date and a few free times, and link the heading to it. This is a test change, not a design decision: if most people in round 2 use it, changing the day becomes a design problem with evidence.
Then play every task through, in the order of the test plan, on the flow Larkfield test. Tap every new element. The tap-every-element check from Get a prototype ready for a usability test applies again, but only to the screens you changed.
Check it worked
From Confirm, Change opens Pick a time; picking a time and continuing returns you to Confirm through the usual screens. Clicking anywhere on the Continue button, including its edges, moves on. The day heading on Pick a time opens Wednesday. All three tasks reach their end, and no tap on a changed screen does nothing.
Step 6 · Put the after beside the before
Go back to the live frames, select each one you changed, copy it and paste it into its section on 10 Revisions, to the right of the round 1 copy. Rename it with – round 2. Align the pair along their tops at the same size, so a difference is a difference in the design and not in the zoom level.
In the third column of each section, add a text box with the change card's text from the Changes tab: evidence, change, expected result, what to watch. Then mark what moved: a short annotation line from the card to each changed element on the round 2 frame. Keep the marks on the round 2 frame only, so the round 1 frame stays a clean record.
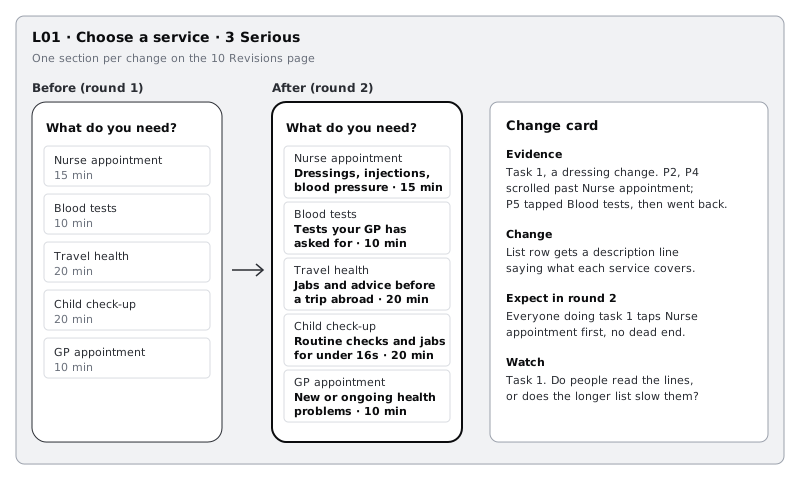
Anyone who opens 10 Revisions should understand each change without the spreadsheet: a developer asking why Confirm changed, a manager asking what the test produced, or you in a month.
Now copy a link to each section (right-click it and look for the copy link option) and paste it into a new Revisions link column on the Changes tab, so the spreadsheet and the file point at each other.
Check it worked
Each section on 10 Revisions holds a round 1 frame, a round 2 frame at the same size and alignment, and a card with the evidence. Every element you changed has an annotation on the round 2 frame. Every row on the Changes tab has a link that opens its section.
Step 7 · Close the loop and get round 2 ready
Finish in four places, so the file, the log and the test link all agree.
- Comments. Each issue from part 9 has a comment pin in the file with its ID. Reply to the pins for the fixed issues with
Changed for round 2, see 10 Revisionsand leave them unresolved. Resolve a comment only when round 2 shows the fix worked. Reply to deferred issues with the reason from the log. - The log. Set
Statuson theChangestab toIn round 2 build. Add a short note at the top of theIssue logtab: what changed, what was deferred, and that L04 has a Wednesday frame so round 2 can settle it. - The flow. Select Home and edit the description of the
Larkfield testflow:Round 2 build. Changed: L01 service descriptions, L03 working Change link and larger time on Confirm, L05 reminder text. New for testing: Wednesday on Pick a time (L04).Update your limits card for the session introduction: Wednesday now works, and the other days still lead toNot part of this test. - The version. From the main menu, use File, then Save to version history, and name it
Test build, round 2, with the change IDs in the description. You now have both tested builds as named versions.
Round 2 uses the same tasks and the same share link. Give the note-takers the Watch column from the Changes tab, and the next issue log starts with the question for each change: did people do what the card expected?
When testing on this project is finished, not now, open the prototype's share settings and narrow the link access to your team, so a link sent to participants stops opening the file. Keep everything else. 10 Revisions, the two named versions and the resolved comments are the project's record of why the design looks the way it does.
Check it worked
The comment pins for L01, L03 and L05 each have a reply pointing to 10 Revisions and are still open. The flow description on Home begins Round 2 build. Version history shows Test build, round 1 and Test build, round 2, and opening round 1 shows the old Confirm, with the time in its round 1 style. Playing the test link from a private window opens Home and shows the new service descriptions.
Next steps
You have taken one product from paper sketches to a tested, revised prototype, and the revisions carry their own evidence. The next round repeats parts 9 and 10 with the same tasks, and each round should need fewer changes than the last.
- Test a Figma prototype with users and log what breaks runs round 2: same tasks, with the
Watchcolumn in the note-taker's hand. - Rate and prioritise usability problems by severity covers the scale in depth, including having a colleague rate the same list to check your ratings.
- Report research findings so the team acts turns the log and the revisions page into a short report for people who were not in the sessions.
- Annotate a design for developers is the step after the final round, when the revised screens go to the people building them.
Related tutorials
- Test a Figma prototype with users and log what breaksYou will run short test sessions with the Larkfield Clinic prototype on a phone and a laptop, sort every problem into a prototype glitch or a real design problem, and end with an issue log where each row links to the frame it happened on.
- Rate and prioritise usability problems by severityYou will have a severity table for the problems from a usability test, rated on a three-factor scale that two people apply the same way, and a ranked fix list the team can plan a release from.
Need this done for you?
Padding does this work for growing companies, from the first diagnosis to a system that keeps working.
Get new tutorials