Figma and design tools · Beginner · 13 min
Place, crop and mask images in Figma
By Padding · Updated 18 Nov 2026
Figma (web) · November 2026
You will have a doctor's profile card in Figma with a cover photo, a circular portrait, a tiled pattern strip and a masked status band, and you will know when to use an image fill and when to use a mask.
On this page
Beginners in Figma often reach for a mask every time a photo needs a shape, then wonder why their layer list is full of groups and why swapping a photo breaks the layout. Most of the time you do not need a mask at all. In Figma an image is a fill, like a colour: it lives on a rectangle, ellipse or frame, and the layer's shape decides what you see. A mask is a separate tool for clipping several layers with one shape.
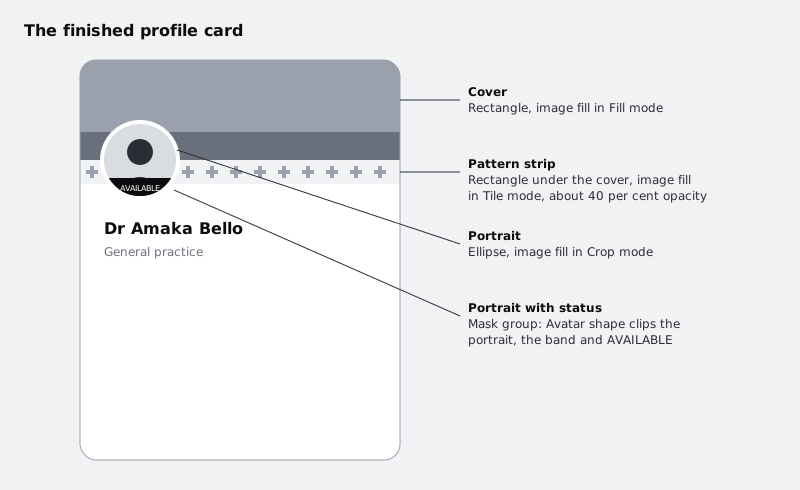
In this tutorial you build one profile card for a doctor at a community clinic. It has a wide cover photo, a round portrait, a thin decorative strip made from a repeated illustration, and a small "Available" band across the bottom of the portrait. Each part uses a different technique, so by the end you have used every image fill mode, made one mask on purpose, and swapped a photo without redoing the crop.
Step 1 · Set up the card frame
Open your Design file and add a new page called Images practice, so the work stays out of your real screens.
Select the Frame tool (F) and draw a frame 320 pixels wide and 400 pixels tall. In the right sidebar, set its width and height exactly, give it a white fill and a corner radius of 16. Rename it Doctor card by double-clicking its name in the layers panel.
Check that Clip content is turned on for the frame (it is in the right sidebar, near the frame's fill and layout settings). With clipping on, anything that hangs over the card's edge is hidden, which you rely on for the cover photo.
Inside the card, draw three placeholder shapes so you have somewhere to put the images:
- A rectangle at the top, 320 by 100, named
Cover. - A rectangle under it, 320 by 24, named
Pattern strip. - An ellipse, 72 by 72 (hold Shift while drawing to keep it round), overlapping the bottom of the cover, named
Portrait.
Add a text layer under the portrait with a made-up name such as Dr Amaka Bello and a second with General practice.
Check it worked
The layers panel shows a frame called Doctor card with five children: Cover, Pattern strip, Portrait and the two text layers. Clicking the frame shows W 320, H 400 and a corner radius of 16 in the right sidebar.
Step 2 · Place images into the shapes
There are three ways to get an image into Figma, and they behave differently.
- Drag a file onto the empty canvas. Figma makes a new rectangle at the image's size with the photo as its fill. Handy for reference images, but you then have to resize it to fit your design.
- Drag a file onto the fill swatch of a selected layer. The image becomes that layer's fill.
- Place image/video, with Shift + Cmd + K on Mac or Shift + Ctrl + K on Windows. Choose several files at once; your cursor then carries them, and each click on an existing shape fills that shape with the next image.
Use the third way. Press Shift + Cmd/Ctrl + K, select your wide photo and your portrait, and confirm. Click the Cover rectangle first, then the Portrait ellipse. Figma shows the next image beside your cursor before each click, so check it before you click; if the photos land the wrong way round, undo and try again.
Figma accepts JPG, PNG, WebP, GIF, HEIC and TIFF files (TIFF only in Safari). Any image larger than 4096 pixels on its longest side is scaled down to fit that limit, so do not expect a huge camera original to keep every pixel.
Check it worked
Select Cover. The Fill section in the right sidebar shows a thumbnail of your wide photo instead of a colour swatch. Select Portrait: its fill is the portrait photo, already showing inside the circle. The layer names have not changed and no new layers appeared.
Step 3 · Choose the right fill mode for the cover
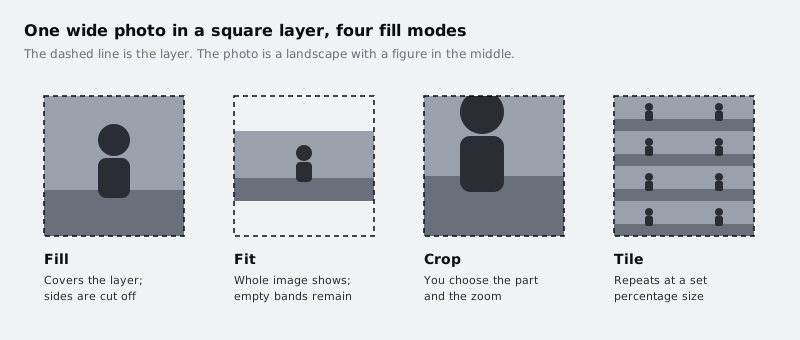
Select Cover and click its image thumbnail in the Fill section. The image settings open, with a dropdown at the top that reads Fill. Try each option and watch the canvas:
- Fill scales the photo until it covers the whole rectangle and cuts off what does not fit. Figma keeps it centred.
- Fit shrinks the photo until all of it is visible. On a wide, short rectangle a normal photo leaves empty space at the sides or top.
- Crop lets you choose exactly which part of the photo shows and how far it is zoomed.
- Tile repeats the image at a size you set as a percentage of the original.
For a cover photo, set the mode back to Fill. It is the safest choice for any slot where the box size is fixed and the photo is decoration: whatever photo you swap in later, the slot is always full.
Fit is the one to use for things that must never be cut, such as a logo or an illustration with text in it. Expect gaps, and give the layer a background colour behind the image fill so the gaps look intentional.
While the image settings are open, look at the adjustment sliders (exposure, contrast, saturation and others). Lower the exposure a little if your cover is bright, so the white name text you might add later stays readable. These changes are non-destructive: the original file is untouched and you can reset the slider at any time.
Check it worked
With Cover selected, the fill dropdown reads Fill. Drag the bottom edge of the Cover rectangle down to 140 pixels tall: the photo grows to stay full with no empty bands. Set it back to 100.
Step 4 · Tile an illustration for the pattern strip
Select Pattern strip. Drag your small illustration or icon file from your computer onto its fill swatch in the right sidebar. The illustration replaces the grey fill.
Open the image settings and change the mode to Tile. A size control appears as a percentage. Lower it until the motif repeats across the strip at a size that looks like a pattern rather than a picture, around 20 to 40 per cent for a typical 512 pixel icon. Set the layer's opacity to about 40 per cent in the Layer section so the strip stays quiet.
If your illustration has a transparent background (PNG or SVG), the strip's own colour shows through between repeats. To get a tint behind it, add a second fill in the Fill section with the + button and drag the solid colour below the image in the fill list.
Check it worked
The strip shows several copies of your illustration side by side, not one stretched copy. In the right sidebar, the Pattern strip's image fill mode reads Tile with a percentage under 100.
Step 5 · Crop the portrait so the face sits in the middle
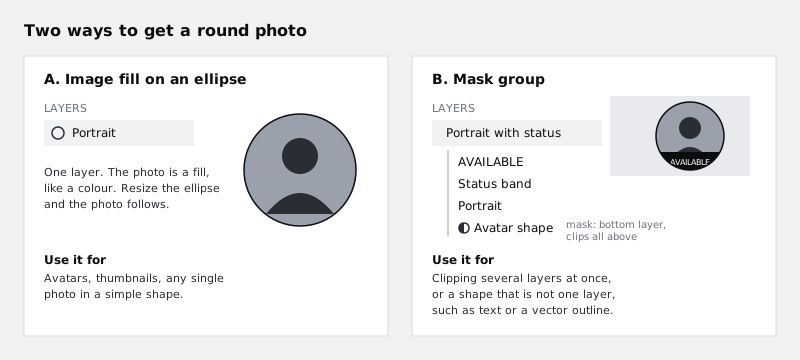
The portrait is already round because the image is a fill on an ellipse. This is the simplest way to get a circular photo, and it needs no mask. (Figma's other routes to a circle are a rectangle with a corner radius of half its width, or a mask. The ellipse fill gives you one tidy layer.)
The problem is usually framing: in Fill mode Figma centres the photo, so a tall portrait may show the chin and chest rather than the face.
Double-click the Portrait layer on the canvas. Figma switches the fill into crop editing. You now see the whole photo faded outside the circle, with handles around it.
- Drag the photo itself to move it until the face sits in the centre of the circle.
- Drag a corner handle to zoom: smaller makes the face fill more of the circle.
- Hold Option (Mac) or Alt (Windows) while dragging a handle to change opposite sides together.
Aim for eyes slightly above the middle of the circle, with a little space above the head. Press Enter or click an empty part of the canvas to finish.
Your crop is not destructive. The rest of the photo is still stored in the fill, so you can double-click again later and reframe.
Check it worked
Select Portrait and open its image settings: the mode now reads Crop, not Fill. On the canvas, the face is centred in the circle with the top of the head visible. Double-click the layer once more and you can still see the parts of the photo you cropped away; press Enter to leave them hidden.
Step 6 · Use a mask where a fill cannot do the job
Now the card needs a small black band reading AVAILABLE across the bottom of the portrait, cut to the curve of the circle. An image fill cannot help here, because two layers (the photo and the band) need clipping to the same shape. This is what masks are for.
Build it like this:
- Draw a new ellipse exactly on top of the Portrait (same size and position). Name it
Avatar shape. Give it any solid fill. - Draw a rectangle across the lower part of the portrait, wider than the circle, about 20 pixels tall, with a black fill. Name it
Status band. Add a small white text layerAVAILABLEcentred on it. - In the layers panel, drag Avatar shape so it sits below Portrait, Status band and the text. In Figma the mask is always the lowest layer: it clips the layers stacked above it.
- Select Avatar shape, Portrait, Status band and the text together (Shift-click in the layers panel).
- Choose Use as mask. Look for it among the selection actions in the right sidebar or in the right-click menu; the shortcut is Ctrl + Cmd + M on Mac or Ctrl + Alt + M on Windows.
Figma wraps the four layers in a group with a mask icon. Rename the group Portrait with status.
Two things to know before you rely on it. First, the mask and the layers it clips move independently, so select the whole group when you want to move the portrait. Second, the mask only clips layers above it inside the same group or frame; anything outside the group is untouched. To undo it, right-click the mask layer and choose Remove mask.
Check it worked
The layers panel shows a group called Portrait with status. Its bottom child is Avatar shape, marked with a mask icon. On the canvas, the black band and the text stop at the edge of the circle instead of running across the card. Drag the Status band layer down a few pixels: it stays clipped by the curve.
Step 7 · Replace a photo without losing the crop
Clinics change staff photos often. If you delete the portrait and place a new one, you lose the framing you set. Replace the image inside the fill instead.
- Select the Portrait layer inside the mask group (double-click into the group, or click it in the layers panel).
- Click its image thumbnail in the Fill section to open the image settings.
- Drag the new photo from your computer onto the image preview in the settings panel (or onto the fill swatch in the sidebar).
The new photo takes the old one's place, and Figma keeps the fill mode, crop and position. If the new person's face sits in a different part of the frame, double-click to adjust the crop as you did before; the layer, its name, the mask and everything else stay as they were.
The same works on Cover and Pattern strip. To test it, swap the cover for a different wide photo: it stays in Fill mode and covers the slot.
Check it worked
The portrait now shows the second photo, and its fill mode still reads Crop. The layers panel is unchanged: same layer names, the same mask group, no extra layers. The cover, swapped for a new photo, is still full with no empty bands.
Next steps
You now have one card that shows the difference between image fills and masks: fills for a single photo in a single shape, masks when one shape has to clip several layers. A good habit is to try a fill first and only make a mask when the fill cannot do it.
- If you skipped the basics of frames, layers and the right sidebar, read /tutorials/tour-the-figma-canvas.
- Keep the card's layers easy to find as it grows with /tutorials/name-and-structure-figma-layers.
- Turn the card into a layout that grows with its content in /tutorials/build-a-responsive-card-with-auto-layout.
- When the card is ready for developers, export the photos at the right sizes with /tutorials/export-assets-from-figma-for-web-and-mobile.
Part of these paths
Related tutorials
- Find your way around the Figma canvasYou will have a Figma file with one phone-sized frame holding a heading, a card and an avatar, and you will know which part of the screen controls each of them.
- Export assets from Figma for web and mobileYou will have a folder of icons and images exported from Figma in the right format and pixel size for a website, an iOS app and an Android app, with names a developer can drop straight into a project.
Need this done for you?
Padding does this work for growing companies, from the first diagnosis to a system that keeps working.
Get new tutorials