Figma and design tools · Beginner · 16 min
Draw icons with vectors and boolean operations in Figma
By Padding · Updated 18 Nov 2026
Figma (web) · November 2026
You will have drawn a calendar icon and a clinic icon on a 24 px grid in Figma with the pen tool, shape tools and boolean operations, and turned them into flattened, outlined SVGs ready for a developer.
On this page
A product needs a handful of small icons long before it needs a full icon set, and they are some of the first things a developer asks for. Drawing them yourself in Figma teaches you how vectors work: a shape is points joined by paths, a stroke is a line drawn along that path, and boolean operations combine shapes into new outlines.
In this tutorial you draw two icons for Larkfield Clinic, a fictional community clinic, and its appointment booking app. The calendar icon goes on the Pick a time screen and the Booked screen; the clinic icon goes on Home and Choose a service. Both sit on a 24 × 24 frame with a 2 px safe margin and a 2 px stroke, which is a common size for interface icons. You finish with an editable source copy of each icon and a clean export copy that is one filled vector.
Type exact numbers into the X, Y, W and H fields in the right sidebar as you go. Whole-pixel positions are what keep a 2 px stroke sharp at small sizes.
Step 1 · Set up a 24 px icon frame with a keyline
Make a new page in your file called Icons, so the icons do not mix with screens. Press F for the Frame tool, click anywhere on the canvas, then in the right sidebar set W to 24 and H to 24. Rename the frame icon/calendar in the layers panel. When you export a frame, Figma turns each slash in its name into a folder, so every icon named this way lands in an icon folder.
New frames have a white fill. Remove it in the Fill section of the right sidebar, so the exported icon has a transparent background. Press Shift + 2 to zoom to the frame; at this zoom you can see individual pixels.
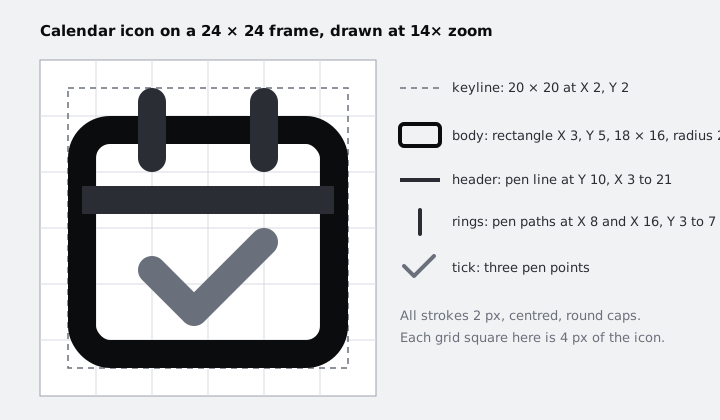
Now draw the keyline: the square the icon should stay inside. Press R for the Rectangle tool, drag a small rectangle inside the frame and set X 2, Y 2, W 20, H 20. Remove its fill, give it a 1 px stroke in a light grey, and rename it keyline. Lock it (the lock icon appears when you hover over the layer) so you do not move it by accident.
Check it worked
Select the frame: the right sidebar shows W 24 and H 24 with no fill. Select keyline: it shows X 2, Y 2, W 20, H 20, and the layers panel shows a lock next to it.
Step 2 · Draw the calendar body and rings
The body is a rounded rectangle with a stroke and no fill. Press R and draw a rectangle inside the frame, then set X 3, Y 5, W 18, H 16 and a corner radius of 2. Remove the fill, add a stroke, set its weight to 2 and its colour to a near-black such as #0B0C0E, and make sure the stroke position is Center.
A centred 2 px stroke on whole-pixel coordinates puts one pixel on each side of the path, so the outer edge of this rectangle lands on X 2 and X 22: exactly on the keyline.
The two rings that hold the pages are short vertical lines. Draw them with the pen tool, which places points exactly where you click: press P, click at X 8, Y 3, hold Shift and click at X 8, Y 7, then press Escape to finish the path. The right sidebar shows X 8, Y 3, W 0 and H 4. Give it the same 2 px stroke. Open the stroke settings in the Stroke section and choose round caps, so the ends are soft rather than square. Duplicate the line with Command + D (Mac) or Ctrl + D (Windows) and set the copy's X to 16.
Rename the layers body, ring-left and ring-right. Select ring-right and check it shows X 16, Y 3, W 0 and H 4.
Check it worked
At Shift + 2 zoom, the rectangle's outer edge touches the keyline on the left, right and bottom. Both rings poke above the body by 2 px and have rounded ends, and each shows W 0 and H 4 in the right sidebar. The layers panel shows three layers plus keyline inside icon/calendar.
Step 3 · Use the pen tool for the header line and a tick
You used the pen tool for the rings; now use it for longer paths. Press P, click once at X 3, Y 10 on the left edge of the body, hold Shift and click at X 21, Y 10 on the right edge. Press Escape to finish the path. Give it the same 2 px stroke and rename it header. Shift keeps the segment horizontal.
The Booked screen needs a version of the calendar with a tick. Duplicate the whole icon/calendar frame, move the copy to the right and rename it icon/calendar-check. In the copy, press P and click three points: X 8, Y 15, then X 11, Y 18, then X 16, Y 13. Press Escape. Set the stroke to 2 px with round caps and round joins, and rename the layer tick.
The tick will rarely be right first time. Select it and press Enter to go into vector edit mode. Click the middle point and nudge it with the arrow keys, one pixel per press, until the two arms look balanced. If you want a curve instead of a corner, the Bend tool in the toolbar that appears in vector edit mode adds handles to a point; drag from the point to pull a curve out. Press Escape to leave vector edit mode.
Check it worked
Select header: the right sidebar shows H 0 (a flat line) and W 18. Select tick and press Enter: you see three points joined by two segments. After you leave vector edit mode, the tick's points still sit on whole pixels when you zoom in.
Step 4 · Build the clinic outline with Union
The clinic icon is a building with a pitched roof and a cross on the front. You make the outline by combining a triangle and a rectangle, so the stroke runs round the outside of both as one shape.
Make a new 24 × 24 frame called icon/clinic, remove its fill and copy the keyline into it at X 2, Y 2.
Open the shape tools menu in the toolbar and choose Polygon. Draw a polygon; it starts as a triangle. Set X 3, Y 3, W 18, H 8 so the roof's peak is at the top centre. Press R and draw the body at X 5, Y 10, W 14, H 11. The roof's base overlaps the body's top by 1 px, which is what lets the two shapes join cleanly.
Select both shapes and press Option + Shift + U (Mac) or Alt + Shift + U (Windows), or choose Union from the boolean operations control that appears when two or more shapes are selected. Rename the new group building. Give the group no fill and a 2 px centred stroke with round joins, so the peak of the roof does not shoot out as a sharp spike past the keyline.
Next, the cross. Draw two rectangles with a near-black fill and no stroke: one at X 9, Y 14, W 6, H 2 and one at X 11, Y 12, W 2, H 6. Select both, union them, and rename the group cross.
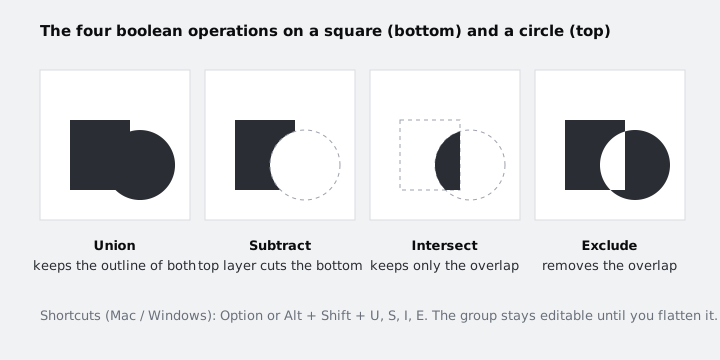
A boolean group is not destructive. Expand building in the layers panel and you still see the polygon and the rectangle inside it. Select the rectangle and change its height: the outline updates.
Check it worked
The clinic outline is one continuous stroke: there is no line where the roof meets the body. The layers panel shows building with two children and cross with two children. The roof's peak stays inside the keyline.
Step 5 · Make a filled variant with Subtract
Tab bars often show a filled icon for the current screen and an outlined icon for the others. Make a filled clinic icon for the Home tab when it is active.
Duplicate icon/clinic and rename the copy icon/clinic-filled. In the copy, select building, remove its stroke and give it a solid near-black fill. The house is now a solid shape and the black cross on top of it disappears into it.
Make sure cross is above building in the layers panel; Subtract cuts the top layer out of the layers below it. Select both groups and press Option + Shift + S (Mac) or Alt + Shift + S (Windows). The cross becomes a hole you can see the canvas through. Rename the result clinic-filled.
Intersect (Option or Alt + Shift + I) and Exclude (Option or Alt + Shift + E) work the same way. You will not need them for these two icons, but try them on a spare pair of shapes to see the difference.
Check it worked
Put a coloured rectangle behind the icon/clinic-filled frame on the canvas: the colour shows through the cross. Undo if the house disappears instead; that means the layer order was the wrong way round.
Step 6 · Keep a source copy, then outline strokes and flatten
So far each icon is a stack of strokes, shapes and boolean groups. That is good for editing but awkward for a developer. A mix of strokes and fills cannot be recoloured with one change, nested groups produce messy markup, and many icon pipelines and icon-font tools expect filled shapes only. Strokes also depend on cap, join and alignment settings that not every tool reads the same way. The fix is to turn every stroke into a filled shape and merge everything into one vector: one filled path whose colour a developer can set with fill or currentColor.
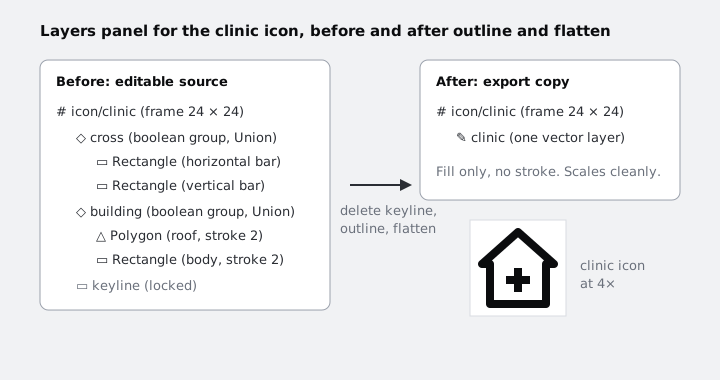
Outlining is destructive: once a stroke is outlined, you cannot change its weight or caps. Before you start, select your four icon frames, group them with Command + G (Mac) or Ctrl + G (Windows), name the group source, duplicate it and name the copy export. Work only in export from here on. When you need to change an icon later, edit source and repeat this step.
In each frame in export:
- Delete the
keylinelayer. It must not end up in the icon. - Select every remaining layer in the frame (click the first in the layers panel, Shift-click the last).
- Right-click and choose Outline stroke, or press Command + Option + O (Mac) or Ctrl + Alt + O (Windows). Each stroke becomes a filled shape the same width.
- With the same layers selected, press Command + E (Mac) or Ctrl + E (Windows) to flatten them into one vector layer.
- Rename the vector to match the icon:
calendar,calendar-check,clinic,clinic-filled.
Check it worked
Each frame in export contains exactly one layer. Select it: the Stroke section of the right sidebar is empty and the Fill section shows your near-black. Press Enter and every edge appears as points, including the inside and outside of what used to be the strokes. Change the fill colour once: the whole icon, including the former strokes, takes the new colour. Undo the change afterwards.
Step 7 · Export the icons as SVG
Select the four frames inside export, not the vectors inside them. Exporting the frame keeps the 24 × 24 box, so every icon arrives the same size with its padding intact. In the Export section at the bottom of the right sidebar, add an export setting and choose SVG. Click the export button. Figma names each file after its frame and turns the slash into a folder, so the download holds an icon folder containing calendar.svg, calendar-check.svg, clinic.svg and clinic-filled.svg. In the browser, several files usually arrive as one zip.
Open one of the files in a text editor. You should see something like an <svg> element with width="24" height="24" viewBox="0 0 24 24" and one <path> element with a fill colour. Developers often replace that fill with currentColor so the icon takes the text colour around it; the export tutorial covers that and other formats.
Check it worked
You have four .svg files. Each one opens with a 24 by 24 viewBox and contains one path and no stroke attribute. Drag one into a browser tab and zoom in: the edges stay sharp at any zoom.
Next steps
You now have an editable source group and an export group of flat SVGs. Next, give the export frames a consistent home and name, and hand them over:
- Export assets from Figma for web and mobile covers SVG settings,
currentColorand PNG sizes for native apps. - Name and structure Figma layers explains the naming that makes icon frames easy for developers to find.
- Tour the Figma canvas is the place to start if any of the tools here were new to you.
Part of these paths
Related tutorials
- Find your way around the Figma canvasYou will have a Figma file with one phone-sized frame holding a heading, a card and an avatar, and you will know which part of the screen controls each of them.
- Export assets from Figma for web and mobileYou will have a folder of icons and images exported from Figma in the right format and pixel size for a website, an iOS app and an Android app, with names a developer can drop straight into a project.
Need this done for you?
Padding does this work for growing companies, from the first diagnosis to a system that keeps working.
Get new tutorials