Figma and design tools · Beginner · 14 min
Export assets from Figma for web and mobile
By Padding · Updated 18 Nov 2026
Figma (web) · November 2026
You will have a folder of icons and images exported from Figma in the right format and pixel size for a website, an iOS app and an Android app, with names a developer can drop straight into a project.
On this page
Exporting from Figma takes a few clicks. The hard part is choosing the format and size, because a file that looks right on your screen can still be wrong for the place it ends up. If an icon is exported as a PNG, it goes blurry when a developer scales it up. If a photo is exported only at 1x, it looks soft on every modern phone. If a file is called Frame 427@2x.png, someone has to open it to find out what it is.
In this tutorial you export the assets for a small appointment booking screen: three icons and one photo of a waiting room. You set up export settings on the layers themselves, so anyone who opens the file later gets the same output. Then you export everything in one batch and sort it into a hand-off folder with one section per destination: website, iOS app and Android app.
The rule that runs through every step is to start from where the asset ends up, then work back to the format.
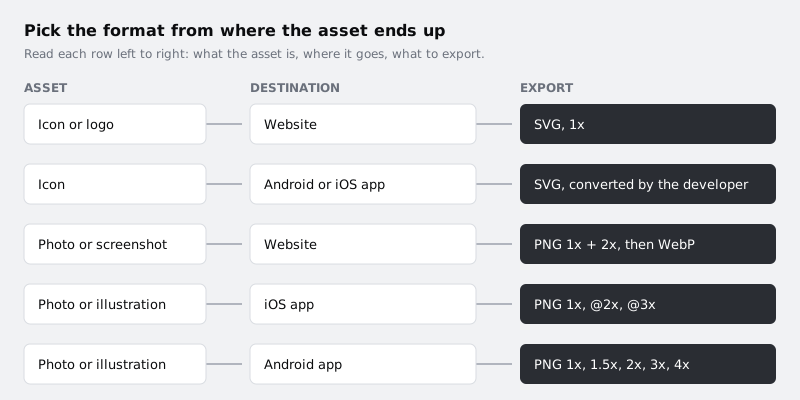
Step 1 · Decide what each asset is and where it goes
Before you touch the Export panel, make a short list on a sticky note in the file, or as a text layer next to your frames. Write one line per asset with three things on it: the asset, the destination and the format.
For this tutorial the list is:
- Calendar icon: website, iOS app and Android app. Vector, so SVG.
- Clock icon: website, iOS app and Android app. Vector, so SVG.
- Tick icon: website, iOS app and Android app. Vector, so SVG.
- Waiting room photo: website, iOS app and Android app. Raster, so PNG at several scales.
Use these rules to fill in the format column:
- Flat shapes, icons, logos, simple illustrations: SVG. SVG keeps the shapes as maths, so one file stays sharp at any size and is usually tiny. On the web a browser uses it directly. Android does not read SVG in an app. The developer converts it to a vector drawable in Android Studio, so you still hand over SVG. On iOS, developers often add vector icons to the asset catalogue, so SVG is usually a good file to give them. Agree the details with your developer.
- Photos, screenshots, anything with soft gradients or texture: PNG at several scales. These are made of pixels, so you export one file per screen density.
- JPG has no transparency and Figma compresses it. Use it only when a destination asks for JPG, such as an email tool.
- WebP is what most websites should serve for photos, because the files are much smaller. Figma does not export WebP (its export formats are PNG, JPG, SVG and PDF). Export PNG from Figma and convert it, either in a converter such as Squoosh or in the site's build step if the developer has one. Step 6 covers this.
Check it worked
Your file has a note with four lines, one per asset, and each line names a destination and one of SVG or PNG. No line says "whatever looks fine".
Step 2 · Prepare the icons so they export at the right size
The bounds of an export come from the layer you select. If you add export settings to the bare vector path of a 24 pixel icon, the file is cropped to the path's own bounds, perhaps 18 by 20. Then every icon has a different size, and they jump around when a developer lines them up.
Wrap each icon in a fixed frame:
- Select the calendar vector and press Option + Cmd + G (Mac) or Ctrl + Alt + G (Windows) to put it in a frame. You can also right-click and choose Frame selection.
- In the right sidebar, set the frame to exactly 24 by 24 and centre the vector inside it. Remove the frame's fill so the background stays transparent.
- Repeat for the clock and the tick.
If an icon uses strokes, they stay strokes in the SVG: a centre-aligned stroke is written as a plain stroke attribute. Inside and outside strokes are different, because SVG has no stroke alignment, so Figma draws them with masks unless Simplify stroke is on. Keep icon strokes centre-aligned (the stroke settings in the right sidebar) so the output is a plain stroke either way. You do not need to outline them by hand, and the strokes stay editable in Figma.
Check it worked
Click each icon frame in turn. The right sidebar shows W 24 and H 24 for all three, and the layers panel shows each vector nested inside its own frame.
Step 3 · Name layers so the files name themselves
Figma uses the layer name as the file name, and a slash in the name becomes a folder. You can use this to get organised output without renaming anything afterwards.
Rename the layers:
- The three icon frames:
icons/calendar,icons/clock,icons/check. - The photo frame:
photos/waiting_room.
Use lowercase letters, digits and underscores only. Hyphens are fine on the web. Android resource names, however, may only contain lowercase letters, digits and underscores, and the same file usually ends up in more than one project. One naming style for all three platforms saves a round of renaming later.
Avoid spaces, capital letters and names that describe position (left_thing, Frame 12). Name the asset by what it shows, not by where it sits on the screen today.
Check it worked
The layers panel shows icons/calendar, icons/clock, icons/check and photos/waiting_room. None of the names has a space or a capital letter.
Step 4 · Add SVG export settings to the icons
Select all three icon frames by Shift-clicking them in the layers panel. In the right sidebar, scroll to the Export section and click the plus button. A new export row appears. Change its format to SVG. The scale control is not used for SVG, because SVG and PDF always export at 1x.
Open the export row's settings (the icon at the end of the row) and set:
- Outline text: on. Your icons have no text, but leaving it on stops a stray text layer from depending on a font the developer does not have.
- Include "id" attribute: off. Developers rarely need the ids, and they make the SVG code longer.
- Simplify stroke: leave it on, which is the default. With it on, Figma writes inside and outside strokes as a
strokeattribute instead of a mask, so a stroked icon stays a short, plain SVG that developers can recolour.
Because all three frames were selected, the setting is added to each of them. Every icon now carries its own export setting, so the next person who opens the file gets the same SVGs.
Check it worked
Click a single icon frame. The Export section in the right sidebar shows one row reading SVG. Right-click the frame, find the Copy as SVG option in the copy submenu, and paste the result into any text editor. The first line contains width="24" height="24".
Step 5 · Add PNG export rows for the photo at each density
A raster file has a fixed number of pixels, but phones and laptops pack two, three or more device pixels into each point of the design. You export the same frame several times at different scales and the device picks the one that matches its screen.
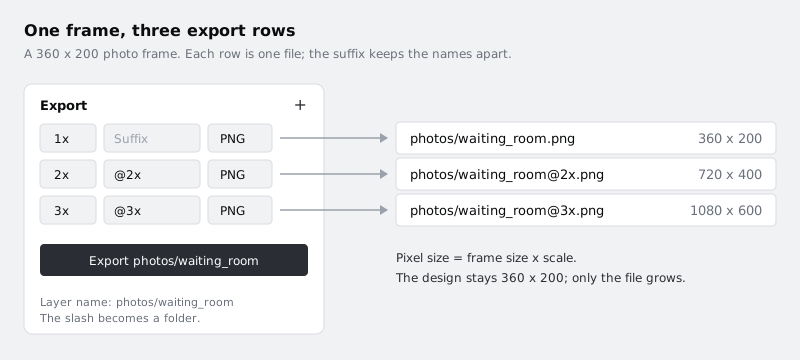
Select the photos/waiting_room frame, which in this example is 360 by 200. In the Export section add rows until you have this set. Each row has a scale, a suffix and a format.
- 1x, no suffix, PNG: web, iOS and Android mdpi.
- 1.5x, suffix
_hdpi, PNG: Android hdpi. - 2x, suffix
@2x, PNG: web, iOS and Android xhdpi. - 3x, suffix
@3x, PNG: iOS and Android xxhdpi. - 4x, suffix
_xxxhdpi, PNG: Android xxxhdpi.
The suffix is added to the end of the file name. Figma may fill in @2x or @3x when you choose those scales. Check each row matches the list, because two rows with the same suffix produce two files with the same name.
Two checks before you export:
- Is the source image big enough? At 3x the 360 pixel frame needs a photo at least 1080 pixels wide inside it, and at 4x it needs 1440. If the photo you placed is smaller, Figma scales it up and the file looks soft. Replace the photo with a larger original before exporting. Figma scales any image larger than 4096 pixels down when you place it, so very large originals are not a problem.
- Colour profile. In the export settings, choose sRGB unless your team has decided to design in Display P3. sRGB is what browsers and most app pipelines expect.
Check it worked
The Export section for the photo frame shows five rows: 1x, 1.5x, 2x, 3x and 4x, all PNG, with five different suffixes.
Step 6 · Export everything in one batch
Deselect everything by clicking an empty part of the canvas. Open File > Export from the main menu, or press Shift + Cmd + E (Mac) or Shift + Ctrl + E (Windows). The Export dialog lists every layer on the page that has export settings, with a count of the files each one makes.
Leave all four layers ticked and click Export. In the browser, the files go to your downloads folder. When there are several files they usually arrive as one zip. In the desktop app, Figma asks where to save. Unzip the download into a new folder called figma-export.
Then convert the web photos to WebP. Open the converter you chose, load waiting_room.png and waiting_room@2x.png, choose WebP as the output and save each with the same name and a .webp extension. Compare the file sizes before and after. Photos usually shrink a lot, but check the converted image for blotchy skies and smeared edges before you accept the quality setting.
If your developer's framework converts images when it builds the site, skip the conversion and hand over the PNGs. Ask them first.
Check it worked
figma-export contains an icons folder with three SVG files and a photos folder with five PNG files. Open waiting_room@2x.png with your computer's image viewer or its file information panel: it reports 720 by 400 pixels. You also have two .webp files that are smaller than the PNGs they came from.
Step 7 · Sort the files into a hand-off folder by destination
A developer building the Android app should not have to work out which of five PNGs goes where. Arrange the export into one folder per destination.
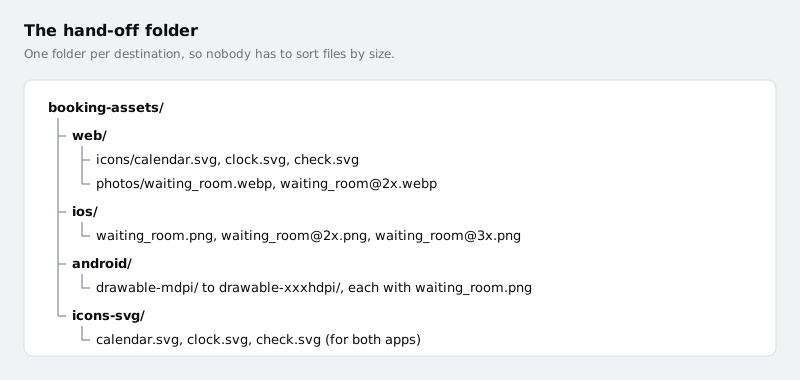
Create booking-assets with four folders inside it:
web/icons/: the three SVGs.web/photos/: the two WebP files.ios/:waiting_room.png,waiting_room@2x.pngandwaiting_room@3x.png, unchanged. The@2xand@3xsuffixes are what iOS expects.android/: five folders nameddrawable-mdpi,drawable-hdpi,drawable-xhdpi,drawable-xxhdpianddrawable-xxxhdpi. Put one PNG in each (1x, 1.5x, 2x, 3x and 4x in that order), and rename every copy to plainwaiting_room.png. Android picks the file by its folder, so the name must be identical in all five.icons-svg/: a second copy of the three SVGs for the app developers to convert.
Add a short README.txt at the top that says which Figma file and page the assets came from, and the date you exported them. When the design changes, whoever re-exports knows where to look.
Check it worked
Open booking-assets/android/drawable-xxhdpi/waiting_room.png. It is 1080 by 600 pixels. Each of the five Android folders contains exactly one file, and all five files have the same name. The web folder contains no PNG files.
Next steps
When a developer asks for "the icons", you can now send a folder they can use without questions. To make the source layers cleaner before you export, see /tutorials/draw-and-edit-vector-shapes-in-figma. To get photos sitting well in their frames, see /tutorials/crop-and-mask-images-in-figma. If developers will pull assets from the file themselves, go through /tutorials/inspect-a-figma-design-as-a-developer together. For the wider hand-off, including specs and notes, read /tutorials/hand-off-a-design-with-figma-dev-mode.
Part of these paths
Related tutorials
- Draw icons with vectors and boolean operations in FigmaYou will have drawn a calendar icon and a clinic icon on a 24 px grid in Figma with the pen tool, shape tools and boolean operations, and turned them into flattened, outlined SVGs ready for a developer.
- Inspect a Figma design as a developerYou will have the CSS for one card from a shared Figma file, written from the spacing, type and variables you read in Dev Mode, and a short list of questions for the designer about everything the file does not answer.
- Place, crop and mask images in FigmaYou will have a doctor's profile card in Figma with a cover photo, a circular portrait, a tiled pattern strip and a masked status band, and you will know when to use an image fill and when to use a mask.
Need this done for you?
Padding does this work for growing companies, from the first diagnosis to a system that keeps working.
Get new tutorials