AI in design · Beginner · 15 min
Make a mood board with AI image tools
By Padding · Updated 18 Nov 2026
Any AI image generator your organisation allows, a canvas or slide tool for the board, and a spreadsheet · November 2026
You will have a mood board for a community clinic that mixes checked AI images with real photo references, with every generated image labelled as AI exploration, and a short list of the visual directions it suggests.
On this page
A mood board is a page of pictures that answers one question before anyone designs a screen: what should this feel like? It is the cheapest place to disagree. Arguing over a wall of images takes an hour; arguing over a finished home page takes a week.
AI image tools make the board faster to fill. You can ask for "a calm clinic waiting room in late afternoon light" and get twenty versions in a minute, including some you could never find as stock photos. They also bring problems: images that look like real places but are not, people who resemble nobody you serve, hands with six fingers, signs written in made-up letters, and the same few looks every tool tends to fall back on. Used carelessly, a generated image can end up in a final design, where nobody remembers it was a sketch.
This tutorial treats AI images as exploration. You will mix them with real photo references, check every one by eye, label each generated image on the board, and finish with a written list of directions. That list, not the images, is what moves into the design. Final images come from a photographer, the client's own library or licensed stock.
The running example is Larkfield Clinic, a fictional community clinic at 14 Mill Lane with an appointment booking app. Before it commissions photos of its building and staff, the team wants a visual direction for the app and website. The brief is three words: warm, local, calm. Use your own project in its place if you have one.
Step 1 · Turn the brief into words you can picture
"Warm, local, calm" means something different to everyone in the room. Before you collect a single image, pin each word down.
Open a spreadsheet and name the first tab Brief. Make three columns: Word, Looks like and Does not look like. Fill one row per word, with things a camera could capture, not more adjectives:
- Warm. Looks like: low sun, wood and fabric, skin tones rendered true, people talking face to face. Does not look like: orange filters, soft-focus glow, stock smiles straight at the camera.
- Local. Looks like: a real street, everyday clothes, signs and objects people in the area would recognise. Does not look like: glass towers, generic "anywhere" offices, tourist landmarks.
- Calm. Looks like: few objects in frame, room to breathe, unhurried posture, daylight. Does not look like: empty clinical white, nobody in the room, staged serenity such as spa candles.
Under the table, write one sentence about where the images will be used: "Hero photo on the Home screen, one image per service page, and the clinic's website header." Add the fixed colours the images must sit beside. Larkfield already has a deep teal accent, #0F5E5A, and a pale tint, #E3F0EE, so add those.
Check it worked
Read each "Looks like" cell aloud and ask: could a photographer go and shoot this? If a cell still holds only feelings ("friendly", "inviting"), rewrite it as something visible. Every word has at least three visible things in each column, and the sheet names where the images will go and which colours they sit beside.
Step 2 · Collect real photo references first
Start with real photographs, before any AI. Real references keep the board honest about what is possible to shoot, and they anchor "local" in somewhere that exists.
Gather eight to twelve images from sources you can trace:
- The client's own photos. Larkfield has phone photos of its entrance, waiting area and the street outside.
- Your own photos. A walk around the area with a phone is often the best research there is: shop fronts, bus stops, the colours of local buildings, how people dress on a weekday.
- Licensed stock or public collections, with the licence page saved alongside the file.
Add a tab called Sources with the columns ID, Type, Where from, Licence or permission, Notes. Give each photo an ID starting with R for reference: R01, R02 and so on. A reference only on the board, never published, still gets a row, because boards get forwarded and reused.
If you are working on a slow or prepaid mobile connection, as many designers in Lagos, Nairobi or Accra do, download smaller preview sizes for references. A board only needs images large enough to read at a glance.
Check it worked
Your Sources tab has at least eight rows starting with R, and every row says where the photo came from. Lay the references side by side: at least two show the clinic's actual surroundings or people like the ones it serves, not a generic location.
Step 3 · Write prompts in a fixed structure
A loose prompt gets the tool's default look, which is the same polished, slightly glossy image everyone else is getting. A structured prompt gives you control, and it lets you change one thing at a time so you can tell what each word does.
Write every prompt with the same six parts, in the same order:
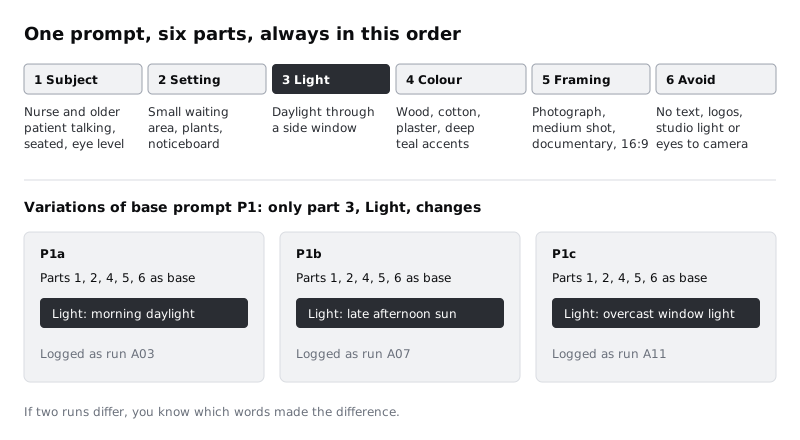
Here is Larkfield's first prompt, written out in full:
Subject: a nurse and an older patient talking, seated, at eye level.
Setting: the small waiting area of a neighbourhood clinic, plants on the
window sill, a noticeboard with paper notices.
Light: daylight through a side window.
Colour and material: wood, cotton fabric, painted plaster, deep teal accents.
Framing: photograph, medium shot, natural documentary style, 16:9.
Avoid: no text or signage, no logos, no stethoscopes worn as props, no
studio lighting, nobody looking at the camera.
Write one base prompt per brief word, so three base prompts in all. Then plan variations that change only one part. For "warm", try three kinds of light. For "local", try three settings: the waiting area, the street outside the entrance, the reception desk. Do not name living artists or photographers to borrow their style, and do not describe a real, named clinic or person.
Add a Prompts tab with Prompt ID, Brief word, Part changed and Full prompt. Use IDs like P1a, P1b, P1c, where the number is the base prompt and the letter is the variation.
Check it worked
The Prompts tab has three base prompts and at least six variations. Pick any variation and compare it with its base prompt: exactly one of the six parts differs. No prompt names a real person, a real organisation or a living artist.
Step 4 · Generate in small batches and log every run
Before your first run, read your tool's terms of use on three points: whether you can use the output commercially, whether it keeps or trains on your prompts and uploads, and whether it marks its images. Note the answers in your spreadsheet. Never upload photos of real patients or staff to an AI tool, and do not upload the client's photos unless the client has agreed and the tool's terms allow it.
Run each prompt once and generate a small batch, usually four images. Large batches feel productive but bury the good ones, and each image costs credits or data. For each run, add a row to a Runs tab:
- Run ID, such as
A07. Every generated image you keep gets an ID starting withA, so it can never be mistaken for a reference. - Prompt ID, the tool's name, and the date.
- Kept (yes or no) and a reason in a few words: "light right, people stiff", "setting too corporate".
Save the images you keep with the Run ID in the filename, such as A07-larkfield-waiting-afternoon.png. Some tools attach Content Credentials, a standard record of how a file was made, to their images. If yours does, keep the original file, because editing or screenshotting it can strip that record.
Check it worked
Every image in your downloads folder whose name starts with A has a row in the Runs tab with its prompt, tool and date. Sort the tab by Prompt ID: each base prompt and each variation has at least one run, and every "no" has a reason.
Step 5 · Check every generated image by eye
AI images fail in ways you only see when you look closely. Open each kept image at full size and go through this list. One fail on any point and the image either leaves the board or gets a written note saying what is wrong.
- Bodies and hands. Count fingers. Look at where arms meet chairs, and where glasses meet faces.
- Text and signs. Generated text is often made-up letters. Even with "no text" in the prompt, posters and noticeboards turn into fake writing.
- Clinical accuracy. Wrong equipment, a blood pressure cuff on the wrong arm, a stethoscope worn as decoration. A nurse at Larkfield can spot these in seconds, so ask one.
- People. Who is shown, and how? Tools lean towards young, slim, light-skinned people, and towards clichés when asked for a place or a culture. Check that skin tones look natural, not washed out or over-darkened, that older and disabled people appear when they should, and that "local" has not become a costume or a stereotype. The related tutorial on bias goes further.
- Look-alikes. Does it closely resemble a real building, a brand's style or a known photograph? If so, drop it.
Add a Checked column to the Runs tab and write "pass" or the problem found.
Check it worked
Every kept image has an entry in the Checked column, and at least one image has been dropped or noted for a problem you found by looking, not one the tool flagged. A person who works at the clinic, or knows the community it serves, has seen the images that show people and staff.
Step 6 · Build the board and label every AI image
Open your canvas tool and make one large frame or slide called Larkfield mood board. Arrange the board in columns, one per brief word, so the team can see which images support which word. Put the brief table's "Looks like" line at the top of each column.
Mix the sources on purpose. Each column gets at least two real references and no more than three AI images. Down one side, add the fixed colours, #0F5E5A and #E3F0EE, as swatches with their hex values, so everyone judges the images beside the colours they will actually sit with.
Then label every tile. Put a small caption under each image:
- References:
R04 · Photo · Larkfield entrance, own photo - Generated images:
A07 · AI-generated · exploration only · <tool>, <date>, prompt P1b
Use the same caption style for both, so the board does not look like it is hiding anything, but make the AI label impossible to miss. Larkfield uses a solid dark tag for AI tiles and an outlined tag for photos, so the difference does not depend on colour alone.
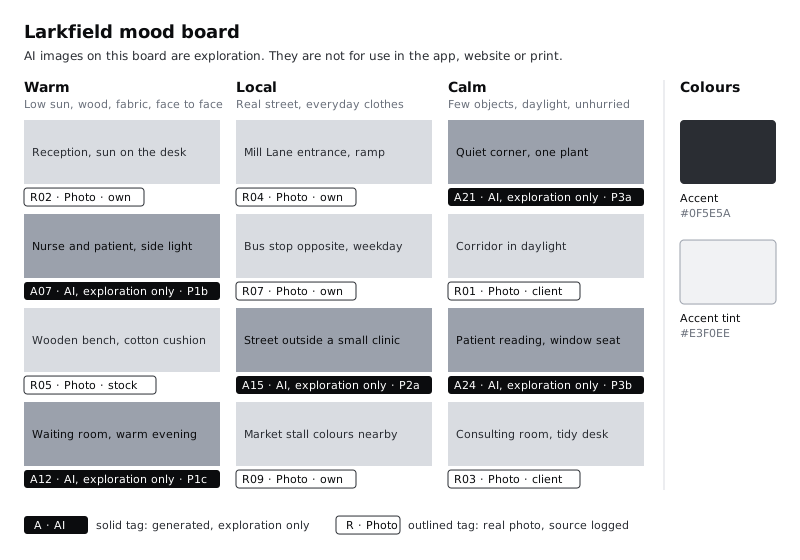
Finally, add a line of text at the top of the board: "AI images on this board are exploration. They are not for use in the app, website or print."
Check it worked
Count the tiles: every one has a caption, every caption starts with an R or A ID that matches a row in your spreadsheet, and every A tile carries the "AI-generated, exploration only" tag. Ask someone who has not seen the board to point at the generated images. They can do it from the labels alone, without guessing from the style.
Step 7 · Write the directions the board suggests
The board is not the deliverable. The directions are. Step back and look for patterns across the columns, then write two or three directions on a new tab called Directions, or in a text box beside the board. For each one, write:
- A short name, such as "Afternoon in the waiting room".
- What the photos show, in the visible terms from your brief: "Seated conversations at eye level, side light, wood and fabric, teal only in small accents such as a cushion or a door."
- Evidence: the tile IDs that support it, references and AI images both.
- What to shoot or source: a short shot list for the photographer or the stock search, such as "Front entrance at 4pm, ramp in frame" or "Reception desk with a staff member mid-conversation".
- What not to do, taken from the dropped images and the "Does not look like" column.
Larkfield's team ended with two directions. "Afternoon in the waiting room" came mostly from AI tiles, which explored light the team could not easily find in stock. "Mill Lane, Tuesday morning" came almost entirely from their own street photos. The second won, because it showed the actual place patients walk into.
Share the board and the directions together. In the message, say plainly that the AI images are for discussion and that final photos will be shot or licensed. Before any image goes near a real screen, it goes through the rights and licences check in the related tutorial.
Check it worked
You have at least two directions, each with a name, visible description, a shot list and tile IDs as evidence. At least one direction cites a real photo reference, not only AI images. Re-read the shot lists: a photographer could act on every line without seeing the AI images at all.
Next steps
- Before any generated image leaves the board, work through /tutorials/check-rights-and-licences-before-using-ai-images.
- Look harder at who your images show and how in /tutorials/check-ai-images-and-copy-for-bias.
- When the real photos arrive, crop and document them with /tutorials/choose-and-crop-photos-for-an-interface.
- Get more control from your prompts with /tutorials/write-prompts-that-give-usable-design-output.
Part of these paths
Related tutorials
- Check rights and licences before using AI imagesYou will have a one-page decision checklist, tested on a real generated image, that tells you whether that image can go into client work, needs changes first, or should not be used.
- Check AI images and copy for biasYou will have an audit table that codes a set of AI-generated Larkfield Clinic images and copy for gender, age, skin tone, disability and setting, a tally that shows where the set is skewed, and a corrected set made by rewriting prompts, dropping outputs and editing copy by hand.
- Choose and crop photos for an interfaceYou will have three licensed photos for a clinic's app and website, each with marked crops for a phone and a desktop ratio, written alt text and a file size budget, collected on one photo sheet a developer can build from.
Need this done for you?
Padding does this work for growing companies, from the first diagnosis to a system that keeps working.
Get new tutorials