UX and research · Beginner · 13 min
Draw a user flow for one task
By Padding · Updated 18 Nov 2026
Paper and a pencil, or any whiteboard or diagramming tool · November 2026
You will have a user flow for booking a first appointment that shows every screen, decision and error path, and a screen list taken from it that tells you exactly what to wireframe.
On this page
A user flow is a map of one task through a product: where the person starts, each screen they see, each point where the path splits, and where they end up, including the places where things go wrong. It sits between research and wireframes. A journey map describes a person's whole experience across channels; a user flow zooms in on one task inside your product and asks, screen by screen, what has to exist for it to work.
Drawing one before you wireframe matters for one plain reason: the screens people forget are rarely the main ones. Nobody forgets the booking form. They forget the screen that says there are no times this week, the message for when someone else took the slot a second ago, and the page that appears when the network drops on the final tap. Each of those turns up later as a rushed design decision or a bug report. A flow puts them on paper while they are still cheap.
This tutorial uses Larkfield Clinic, a fictional community clinic building an appointment booking app. The main screens are Home, Choose a service, Pick a time, Your details, Confirm and Booked. You will draw the flow for one task, a new patient booking their first appointment, using five symbols, then turn the drawing into the list of screens and states the wireframes need.
Step 1 · Write the task on one line
A flow covers a single task with one clear start and one clear finish. Before you draw anything, write four short lines at the top of the page:
- Who: the person doing the task. For Larkfield: a new patient, not yet registered, booking for themselves.
- Task: what they are trying to get done, in their words. "Book my first appointment."
- Starts at: the first thing they see in your product. Here, the app's Home screen, opened after a friend recommends the clinic.
- Done when: the moment the task is complete from their point of view. Here, they see that the appointment is booked and know a reminder is coming.
Resist the urge to widen it. Rescheduling, cancelling and booking for a child are real tasks, but each one is its own flow. Write them in a "later flows" list in the corner of the page so they are not lost. If the task sentence needs "and" to join two goals, it is two flows.
Check it worked
Your page has four lines at the top (Who, Task, Starts at, Done when), and the Task line is one goal with no "and". There is a separate "later flows" list with at least one task you deliberately left out.
Step 2 · Agree a small set of symbols
Flow diagrams have formal notations with dozens of shapes. You need five, and everyone who reads the flow should be able to learn them in ten seconds:
- Start and end: a pill (a rectangle with fully rounded ends).
- Screen: a rectangle with a thin bar across the top, like a window. Write the screen's name inside.
- Decision: a diamond holding a question with a yes or no answer, such as "Any times free?".
- System step: a rectangle with rounded corners, for work the app or clinic system does that the person does not see as a separate screen, such as saving a booking.
- Error or other state: a dashed rectangle, for a screen shown in a different condition: empty, failed, expired.
Arrows connect them in the order the person moves. Every arrow that leaves a diamond gets a short label ("Yes", "No", "Taken").
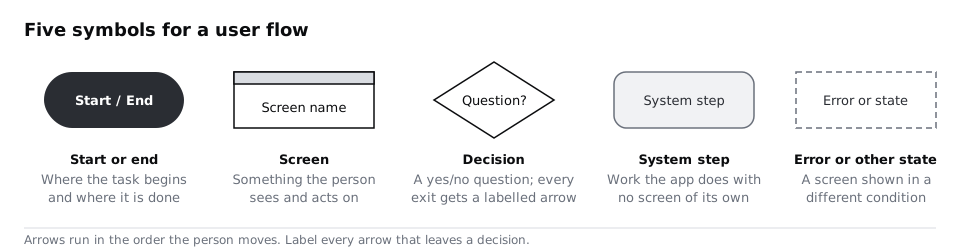
Draw the key in a corner of your page. On paper, a pencil lets you redraw as you go; you will.
Check it worked
Your page has a key with all five symbols, each with a one or two word name. Someone who has not read this tutorial can tell you what a dashed box means by looking at the key.
Step 3 · Draw the happy path first
The happy path is the route where everything goes right: times are free, the details are valid, the booking saves. Draw it as one line from left to right, wrapping onto a second row if you run out of width. For Larkfield:
- Start (pill): needs a first visit.
- Home (screen).
- Choose a service (screen): for example, a new patient check.
- Pick a time (screen).
- Your details (screen): a new patient has no record yet, so this is where name, date of birth and contact details are collected.
- Confirm (screen): a summary of the service, time and details, with a button to book.
- Hold time and save booking (system step).
- Booked (screen).
- End (pill): reminder set.
Name each screen with a short noun or verb phrase that says what the person does there, and use the same name every time it appears. "Pick a time" in the flow and "Calendar" in the wireframes is how two people end up designing the same screen twice.
Do not add any decisions yet. Get the spine down first so you can see the length of the task. If it already has more than ten or so screens, check whether you have merged two tasks.
Check it worked
You can trace a single line of arrows from the Start pill to the End pill without lifting your finger, and every box on it uses one of the five symbols from your key. Every screen name appears only once.
Step 4 · Add a decision wherever the path can split
Go along the happy path one box at a time and ask: what does the app or the person have to check here before moving on? Each answer that can come out more than one way becomes a diamond. Put the diamond straight after the box where the check happens.
For the Larkfield flow, three checks change what happens next:
- After Pick a time: "Any times free?" The person may open a week with nothing available.
- After Your details: "Details valid?" A date of birth in the future or a phone number with a missing digit has to be caught.
- After the save system step: "Saved?" The booking can fail even when the person did everything right.
Label the happy-path exit of each diamond ("Yes"), and leave the other exit as a short, unlabelled stub for now. You will fill those in next.
Not every choice is a decision diamond. Picking a service from a list does not split the flow, because every service leads to Pick a time. Only draw a diamond when the next screen depends on the answer.
Check it worked
Each diamond holds one question that can be answered yes or no, sits directly after the box where the check happens, and has a labelled "Yes" arrow plus a stub for the other answer. Your Larkfield flow has three diamonds.
Step 5 · Finish every branch, including errors
Now take each stub and follow it to a place the person can act from. A branch is only finished when it reaches a screen, a state, or the End pill. A branch that stops in mid-air is a dead end, and a dead end on paper becomes a person staring at a frozen app.
For Larkfield:
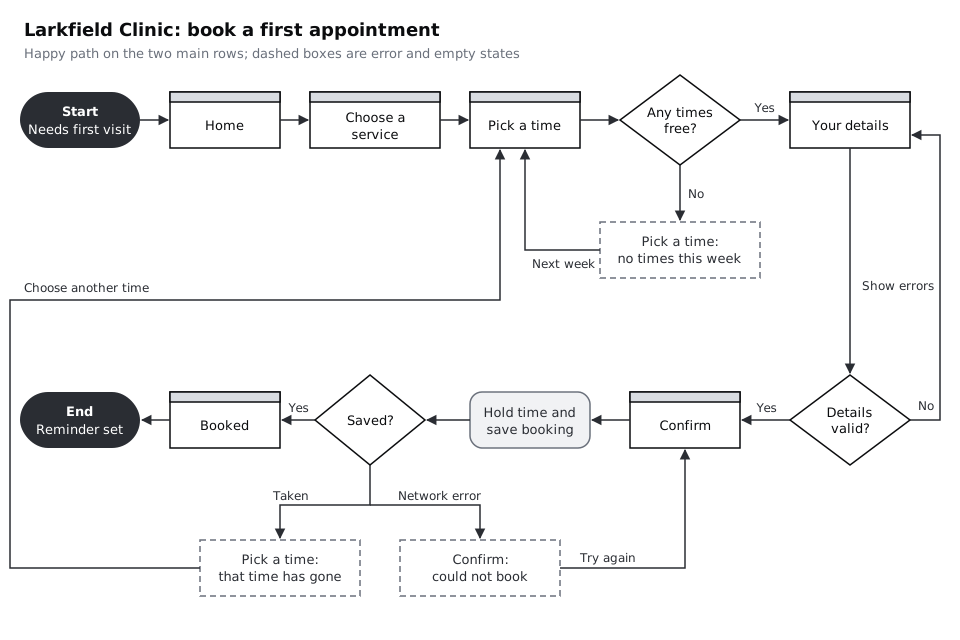
- Any times free? No leads to a dashed box, "Pick a time: no times this week". From there, an arrow labelled "Next week" goes back to Pick a time. Write down here what the screen offers: the next week, or the next date with a free slot.
- Details valid? No loops straight back to Your details, labelled "Show errors". The person stays on the same screen and sees what to fix; it is not a new screen, but it is a state the wireframe has to show.
- Saved? No splits into two, because the cause changes what the person can do. If someone else booked that time while this person was typing, the arrow labelled "Taken" goes to "Pick a time: that time has gone" and back to Pick a time to choose another. If the connection dropped, the arrow labelled "Network error" goes to "Confirm: could not book", which returns to Confirm with a "Try again" arrow, details still filled in.
Ask "what if" once more at every screen, not only at diamonds. What if the person taps back on Confirm? What if they close the app on Your details and come back an hour later? You will not draw all of these, but any answer that needs a new screen or state goes on the flow.
Check it worked
Put your finger on each diamond and follow every exit. Each one ends at a screen, a dashed state that has its own way out, or the End pill. Your Larkfield flow has three dashed states (no times, time has gone, could not book) and one loop back to Your details.
Step 6 · Walk the flow with someone who did not draw it
You know what you meant, so you cannot read your own flow fairly. Give it to a colleague, ideally someone who will build or test it, and ask them to talk through it as the new patient, out loud, from Start to End. Then ask them to do it again as someone who hits each error.
While they talk, note on a separate sheet:
- any place they ask "and then what?" (a missing arrow or screen);
- any arrow without a label leaving a diamond;
- any screen they think does two jobs;
- any word they use for a screen that differs from your label.
Fix each one on the flow before you move on. If they ask about something deliberately out of scope, such as cancelling, point to your "later flows" list rather than adding it.
Check it worked
Your notes sheet has every question your colleague asked, and each one is either fixed on the flow (ticked) or moved to the "later flows" list. Your colleague can walk the error routes without asking you anything.
Step 7 · Turn the flow into a screen list
The flow's job is to tell the wireframes what to draw. Make a simple table, on paper or in a spreadsheet, with one row per screen, one per dashed state, and one for each loop that shows a screen in a new condition (such as a form with errors). Four columns are enough:
- Screen or state: the exact name from the flow.
- Arrives from: the boxes with arrows into it.
- Leaves to: the boxes its arrows go to.
- Must show: what has to be on it for the arrows to work, in a few words.
For Larkfield, the list comes to six screens and four states (three dashed, plus Your details with errors). Written out row by row:
- Home. From: Start. To: Choose a service. Shows: a clear way to book.
- Choose a service. From: Home. To: Pick a time. Shows: list of services, new patient check first.
- Pick a time. From: Choose a service, no times, time has gone. To: Your details. Shows: free times by day, a way to change week.
- Pick a time: no times this week. From: Pick a time. To: Pick a time. Shows: why it is empty, next free date.
- Pick a time: that time has gone. From: Saved? (Taken). To: Pick a time. Shows: what happened, nearby free times.
- Your details. From: Pick a time. To: Confirm. Shows: fields a new patient needs.
- Your details: with errors. From: Details valid? (No). To: Your details. Shows: which field, what to change.
- Confirm. From: Your details, could not book. To: Booked. Shows: service, time, details, book button.
- Confirm: could not book. From: Saved? (Network error). To: Confirm. Shows: what failed, try again, details kept.
- Booked. From: Saved? (Yes). To: End. Shows: time, place, reminder note.
Ten items, against six on the original screen list. Those four extra states are the point of the exercise: each one is now a frame someone will design, rather than a gap someone discovers in testing.
Check it worked
Every screen and dashed state on your flow has exactly one row in the table, with the same name, and each loop back to the same screen has a row of its own. Count screens, dashed states and loops on the flow, then count the rows; the numbers match. For Larkfield: six screens, three dashed states and one loop, ten rows.
Next steps
Your screen list is the brief for the next stage. Sketch each screen and state on it in Sketch wireframes on paper before opening Figma, then rebuild the chosen sketches as frames in Build a low-fidelity wireframe in Figma.
If you drew the flow without research behind it, go back a step: Map a current-state customer journey shows how people do the task today, and Write a problem statement before you design keeps the flow tied to the problem you are solving.
Part of these paths
Related tutorials
- Map a current-state customer journeyYou will have a journey map of how patients book, attend and follow up on a clinic appointment today, with every pain point tied to the research that shows it and every guess marked as a guess.
- Sketch wireframes on paper before opening FigmaYou will have a photographed set of paper sketches for every screen and state in the Larkfield Clinic booking flow, each one chosen from several rough layouts drawn against the clock.
Need this done for you?
Padding does this work for growing companies, from the first diagnosis to a system that keeps working.
Get new tutorials