Figma and design tools · Intermediate · 14 min
Hand off a design with Figma Dev Mode
By Padding · Updated 18 Nov 2026
Figma (web) · November 2026
You will have the Larkfield Clinic booking screens cleaned up, grouped in one section, checked from the developer's side in Dev Mode, marked ready for dev and sent with a short note that lets a developer build without a handoff meeting.
On this page
A handoff fails quietly. The designer marks a file ready, the developer opens it, and within an hour there is a message asking which of three blue buttons is the real one, whether the 14px gap is deliberate, and what the screen looks like when there are no appointments. Each answer costs a conversation, and the answers end up in chat instead of the file, so the next developer asks again.
Dev Mode is Figma's developer view of a design file. A developer can inspect any layer, read its values as code, see which variables it uses, and jump straight to the parts of the file that are ready. It shows what is in the file. If the file has a raw hex colour where a variable should be, Dev Mode shows the raw hex. Most of the work of a good handoff happens before you press anything in Dev Mode.
This tutorial takes the designer's side. You prepare the Larkfield Clinic booking flow (Home, Choose a service, Pick a time, Your details, Confirm, Booked), fix what a developer would trip on, look at it the way the developer will, then mark the flow ready for dev and send it. The details of reading a file as a developer are in Inspect a Figma design as a developer.
Step 1 · Decide what this handoff covers
Before you change anything in the file, write down what you are handing over. A developer builds what you mark, so be exact about the edges.
Open a note and fill in five lines:
- Scope. The screens in this handoff. For Larkfield: Home, Choose a service, Pick a time, Your details, Confirm, Booked.
- Version. A label you will put on the section, such as "Booking flow · v1". When you revise it later, the label changes and nobody builds from an old copy.
- Not included. Work that looks related but is not ready, such as cancelling a booking or the reminder email. Say so, or a developer will assume it exists somewhere.
- Open questions. Anything still undecided, with who decides and by when. One honest open question is better than a screen that pretends to be final.
- Contact. Who the developer asks, and where (a channel, not a private message), so answers can be found later.
Then list the states each screen needs beyond its happy path. For the booking flow that means at least: Pick a time with no free slots, a loading state while slots are fetched, Your details with a field error, and Confirm when the slot was taken by someone else in the meantime.
Check it worked
Your note has the five lines filled in, and a list of missing states with a screen name next to each. If you cannot fill in "Not included", ask the person who owns the product what is in the first release before going further.
Step 2 · Replace hard-coded values with variables
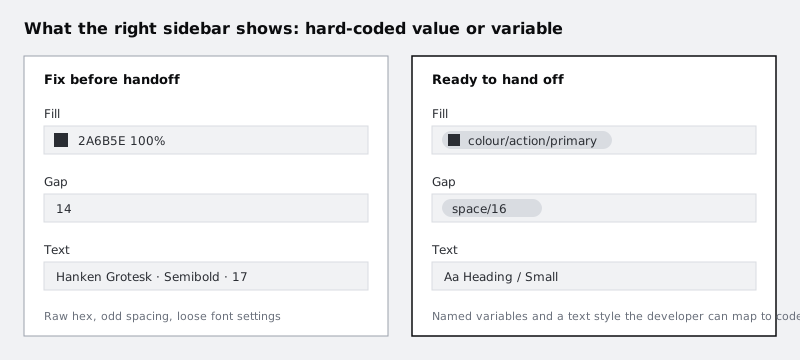
A developer maps your colours and spacing to tokens in code. Every value that is not bound to a variable becomes a guess: is #2A6B5E the primary action colour or a near miss? Fix these before marking anything ready.
Work through the screens one at a time:
- Colours. Select a whole screen frame. With several layers selected, the right sidebar lists every colour in the selection under selection colours. Each entry shows either a variable or style name, or a bare hex value. Click a bare hex and pick the matching variable from your colour collection. Changing it there updates every layer in the selection that uses that colour.
- Spacing. Select each auto layout frame and look at the gap and padding fields. A bound value shows the variable name; a plain number does not. Bind each one to a spacing variable. If you find a 14 where the system has 12 and 16, decide which was meant and use that. Do not create a 14 variable to make the warning go away.
- Corner radius. Same check for radius on cards, buttons and inputs, if you have radius variables.
- Text. Every text layer should use a text style. A layer showing a font family, weight and size instead of a style name is loose.
- Components. Buttons, inputs and list rows should be instances of your components, not detached copies. A detached instance looks right, but the developer cannot see which component it is meant to be.
Check it worked
Select each of the six screens in turn. The selection colours list in the right sidebar shows only variable or style names, with no bare hex values. Click into three auto layout frames at random: gap and padding show variable names. Every button, input and list row you expected to be a component shows the component instance icon in the Layers panel, not a plain frame icon.
Step 3 · Draw the missing states and tidy the layers
Add the states from your list in step 1 as their own frames, next to the screen they belong to. Name them so the relationship is obvious: "Pick a time / No slots", "Pick a time / Loading", "Your details / Field error", "Confirm / Slot taken". Use the same components and variables as the main screens, so they pass the checks in the previous step.
Then make the layer tree readable. A developer clicking through Dev Mode sees your layer names, and "Frame 418" or "Rectangle 22" tells them nothing. Rename the layers a developer will select: the slot list, each slot button, the form fields, the primary action, the error message. You do not need to name every decorative shape. Name and structure Figma layers covers a naming pattern.
Last, remove anything that is not part of the build from the area you are about to mark: old versions, exploration frames, sticky notes to yourself. Move them to a separate page called "Archive" or "Explorations".
Check it worked
Each main screen has its state frames beside it, named "<Screen> / <State>". In the Layers panel, expand Pick a time: the slot list and its buttons have real names, and there are no layers called "Frame" followed by a number at the top two levels.
Step 4 · Put the flow in one section with a read-me frame
Dev Mode statuses go on sections, frames or components. Marking each screen separately works, but one section for the whole flow keeps the scope you wrote in step 1 in one place.
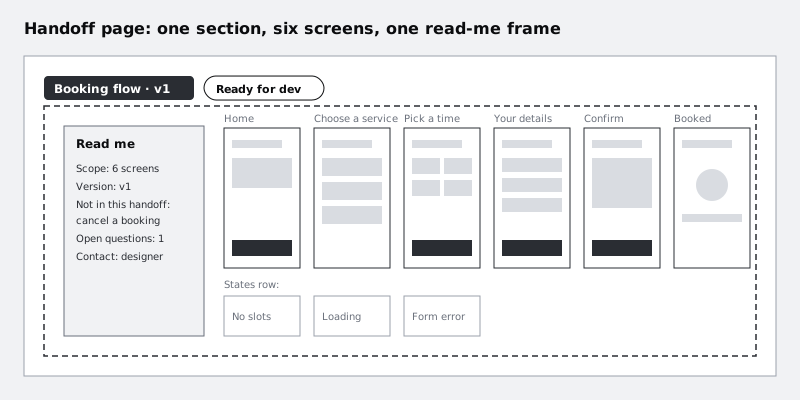
- Arrange the six screens left to right in flow order, with their state frames in a row underneath.
- Add a small frame at the left called "Read me" and paste in your note from step 1: scope, version, not included, open questions, contact. Use plain text. This is the first thing a developer reads.
- Select the read-me frame, the screens and the state frames, and wrap them in a section, using the section tool in the toolbar or the right-click menu.
- Name the section with the version label, "Booking flow · v1".
If the section sits inside another section, the outer one is the one you mark. Keep the handoff section at the top level of the page so its status is not tied to unrelated work.
Check it worked
The canvas shows one section labelled "Booking flow · v1". Inside it, from left to right: the read-me frame, then Home, Choose a service, Pick a time, Your details, Confirm and Booked, with state frames below. Nothing that is not in your scope sits inside the section.
Step 5 · Annotate what a static frame cannot show
Some decisions do not show in a still screen: what happens when a slot button is tapped twice, how long the Booked confirmation stays before returning Home, which fields are required, and what the reminder copy says. Add those as annotations on the layers they belong to, and add measurements where a spacing relationship matters more than the individual values.
Keep annotations for behaviour and intent. Values that Dev Mode already shows from your variables (colours, padding, font sizes) do not need writing out again. The method, including what to annotate and how to word it, is in Annotate a design for developers.
Check it worked
Every open question in your read-me frame either has an owner and date, or has been answered and moved into an annotation on the right layer. Pick a time and Your details each carry at least one annotation describing behaviour, not appearance.
Step 6 · Walk the file as the developer will
Before you mark anything, look at the handoff from the other side. Doing it now means anything you fix is fixed before a status exists, so nobody is notified about a section that is about to change. Press Shift D, or use the Dev Mode toggle in the toolbar. The canvas stays the same, but the right sidebar becomes the inspect panel.
The ready for development list in the left sidebar will not show your flow yet, because nothing is marked. Navigate with the Layers panel or by clicking the section on the canvas instead. Go through this route, which is roughly what a developer does first:
- Find the work. Select "Booking flow · v1" in the Layers panel and zoom to it. Check there is no other section on the page that a developer could mistake for it.
- Read the read-me frame. Click it. If something you wrote only makes sense to you, rewrite it now.
- Inspect a button. Select the primary action on Confirm. The inspect panel should show the component name, the colour as a variable, and padding as spacing variables. If it shows a hex value or a bare number, go back to step 2.
- Inspect text. Select the heading on Pick a time. It should show a text style name.
- Open a state. Click "Pick a time / No slots" and check it reads as part of the same flow, with its own annotations.
- Check assets. Select an icon or image that the developer needs as a file. If there are no export settings on it, add them in Design mode. Export assets from Figma for web and mobile covers formats and sizes.
Press Shift D again to go back to Design mode, fix anything you found, then walk the parts you changed once more.
Check it worked
You have selected at least one button, one heading and one state frame in Dev Mode, and none of them showed a raw hex colour, a loose font or an unnamed layer. The section label still shows no status: you have not marked anything yet.
Step 7 · Mark the section ready for dev
Marking is the last thing you do before sending. A ready status tells developers to start building, and Figma notifies people with a Full or Dev seat who have viewed the file in Dev Mode the first time something in it is marked ready.
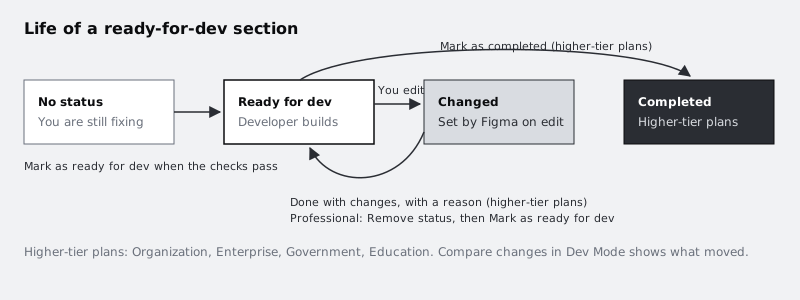
Select the section. Next to its label, click Mark as ready for dev. The label now shows a Ready for dev status. You can do this from Design mode or from Dev Mode. Once it is marked, the section also appears in the ready for development list in Dev Mode's left sidebar.
Know what happens next, because it affects how you work in the file:
- If you edit anything in the section, Figma flags it as changed automatically. You cannot set or skip this yourself. Updates to library component instances, changes to the value of a variable or style a layer already uses, and temporary changes do not set it.
- When your edit is finished, on Organization, Enterprise, Government and Education plans, select the section, open its status and choose Done with changes, adding a reason such as "Pick a time: slot buttons now 48px tall". The status returns to Ready for dev, and the developer can use Compare changes in Dev Mode to see the difference.
- When your edit is finished, on a Professional plan, Figma's statuses article does not list updating a changed design for your plan, so there is no Done with changes. Remove status and Mark as ready for dev carry no plan restriction: open the status, choose Remove status, then click Mark as ready for dev again, and tell the developer in your handoff channel what changed. For anything bigger, duplicate the section as "Booking flow · v2" and mark that instead.
- When the build is done, on the same higher-tier plans a developer or designer can choose Mark as completed from the status menu. Professional has no Completed status; agree in the channel that the build is done, and leave the v1 label as the record.
- If you marked it too early, open the status and choose Remove status, on any plan.
Check it worked
The section label shows Ready for dev, and clicking it opens a menu that includes Remove status. In Dev Mode, the ready for development list in the left sidebar now shows "Booking flow · v1". Your read-me frame says how you will signal later changes: Done with changes with a reason on plans that have it, or Remove status, mark ready again and a note in the channel (or a v2 section) on Professional.
Step 8 · Send the handoff
Copy a link to the section. Right-click the section's label on the canvas, or the section in the Layers panel, and choose Copy/Paste as then Copy link. Do this while you are in Dev Mode: a link to a file in Dev Mode opens in Dev Mode for the person who follows it, so the developer lands in the right view, on the right section.
Post the link where you said in the read-me frame, with a short message:
- what is ready ("Booking flow v1: six screens and four states")
- what is not ("cancel a booking is not included")
- open questions with owners and dates
- how you will signal changes. On plans with Done with changes: "I'll use Done with changes with a reason; anything bigger gets a v2 section". On Professional: "If I change something, I'll post what changed here and re-mark the section ready; anything bigger gets a v2 section".
Dev Mode statuses and their notifications need a Dev or Full seat, so check which seat the developer has before the build is due to start, and ask your Figma admin to change it if needed.
Check it worked
Paste the copied link into a new browser tab. The file opens in Dev Mode with "Booking flow · v1" selected and in view, not the top of the page or a single screen inside it. If it lands somewhere else, copy the link again from the section label. Then read your posted message back: it contains all four items, what is ready, what is not, open questions with owners and dates, and how you will signal changes for your plan.
Next steps
- Read the same file from the developer's chair in Inspect a Figma design as a developer.
- Write clearer behaviour notes with Annotate a design for developers.
- If step 2 turned up many hard-coded colours, set up a proper collection with Create colour variables with light and dark modes.
- Bind gaps, padding and radius to a scale with Use number variables for spacing and radius.
Part of these paths
Related tutorials
- Annotate a design for developersYou will have one Figma screen with its error, empty and loading states beside it and notes on validation, truncation, focus order and responsive behaviour, so a developer can build it without asking you what happens when things go wrong.
- Inspect a Figma design as a developerYou will have the CSS for one card from a shared Figma file, written from the spacing, type and variables you read in Dev Mode, and a short list of questions for the designer about everything the file does not answer.
- Create colour variables with light and dark modesYou will have a Figma screen whose every colour comes from variables, so switching one setting on the frame turns it from light to dark and back.
Need this done for you?
Padding does this work for growing companies, from the first diagnosis to a system that keeps working.
Get new tutorials